
Rich Challah: A Celebration of Texture and Taste
There’s a particular magic to challah, an aroma that fills the kitchen with warmth and tradition. I remember, as a child, the anticipation of Shabbat dinner, knowing that the centerpiece on our table would be a beautifully braided, golden challah, its scent a comforting promise of a delicious meal. My grandmother, a woman whose hands were always dusted with flour, would spend hours meticulously shaping and braiding. The way the dough rose, seemingly by its own will, and then transformed in the oven was a culinary miracle to my young eyes. It wasn’t just bread; it was an edible hug, a testament to love and shared moments. This recipe, with its perfect balance of richness, reminds me so much of those cherished family traditions, evoking the same comforting, homemade quality that makes challah so special.
Recipe Overview
- Prep Time: 45 minutes
- Cook Time: 35-45 minutes
- Total Time: Approximately 2 hours (plus rising time)
- Servings: 16
- Yield: 1 Large Loaf
- Dietary Type: Dairy-Free (if using water), Contains Eggs and Gluten
Ingredients
This challah recipe strikes a beautiful balance, ensuring a tender crumb without being overly dense. The inclusion of oil contributes to a delightful cake-like texture that is simply divine.
For the Dough:
- 1⁄2 cup water (or 1/2 cup milk, for added richness)
- 4 large eggs
- 6 tablespoons oil (vegetable, canola, or a neutral-flavored oil works best)
- 6 tablespoons sugar
- 1 1⁄2 teaspoons salt
- 5 cups all-purpose flour, plus more for dusting
- 2 1⁄2 teaspoons instant yeast (or follow your yeast manufacturer’s recommendation per cup of flour)
- Alternatively, if using a bread machine: 2 1⁄2 teaspoons bread machine yeast (or follow your yeast manufacturer’s recommendation per cup of flour)
For the Glaze:
- 2 large egg yolks
- 2 tablespoons water
- 1⁄8 teaspoon salt
Equipment Needed
- Large mixing bowl (for hand mixing) or stand mixer with dough hook
- Bread machine (optional, for dough cycle)
- Clean, lightly oiled bowl for rising
- Clean, lightly oiled surface for shaping
- Sharp knife or bench scraper
- Baking sheet (a half-sheet pan is ideal)
- Parchment paper (optional, for easier cleanup)
- Pastry brush
- Aluminum foil
Instructions
Crafting a beautiful challah is a rewarding process, and this recipe breaks it down into manageable steps, whether you’re a seasoned baker or just starting your bread-making journey.
-
Initiating the Dough (Bread Machine Method): If you opt for the convenience of a bread machine, begin by adding your ingredients to the bread pan in the order suggested by the manufacturer. Select the dough setting and press start. This will mix and knead the dough for you, bringing it to the perfect point for shaping.
-
Initiating the Dough (Stand Mixer Method): For those using a stand mixer, combine the dry ingredients in the mixer bowl. Turn the mixer on to a low speed to begin incorporating them.
-
Adding Wet Ingredients (Stand Mixer Method): Add the eggs to the dry mixture one at a time, ensuring each egg is mostly incorporated before adding the next. Once the eggs are mixed in, add the oil.
-
Kneading the Dough (Stand Mixer Method): Turn the mixer up to the next speed (typically speed 2 on a KitchenAid). Slowly stream in the milk (if using) or water. Continue to knead the dough until it is soft, smooth, and warm to the touch, which should take about 3 to 4 minutes. The dough should be pliable and elastic.
-
First Rise: Lightly grease a large bowl and place the dough into it. Turn the dough to coat all sides with the oil. This prevents it from drying out. Cover the bowl and allow the dough to rest and rise in a warm place until it has doubled in size. This can take anywhere from 1 to 2 hours, depending on the ambient temperature.
-
Shaping the Challah – Preparing the Dough: Once the dough has doubled, gently punch it down to release the air. Turn the risen dough out onto a lightly oiled surface. Allow the dough to rest for 5 minutes. This brief rest helps the dough relax after being punched down, making it more pliable for shaping.
-
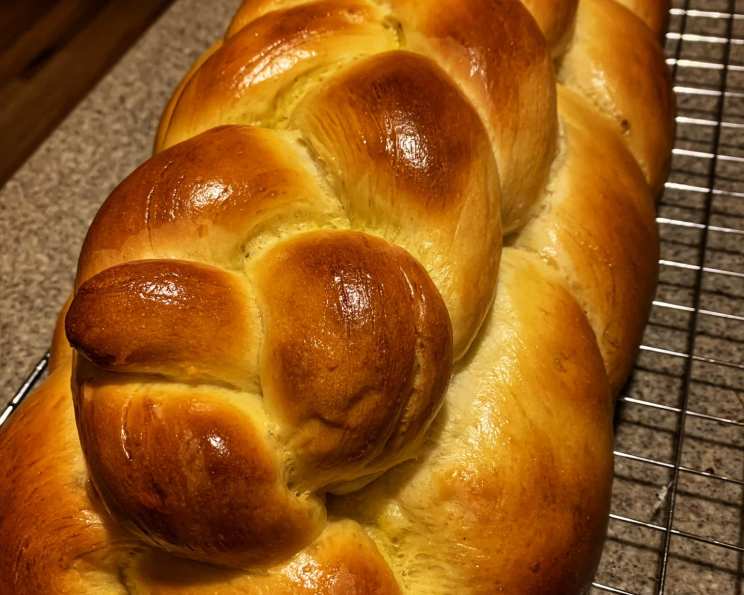
Shaping the Challah – The Base Braid: Shape the entire dough into a log. Using a sharp knife or bench scraper, cut off one-third of the dough and set it aside. Take the remaining two-thirds of the dough and cut it into 3 equal pieces. Roll each of these pieces into an 18-inch rope. Place the three ropes side-by-side and begin braiding them together. Start braiding from the middle and work your way to one end. Pinch the ends together to seal and then tuck them under. Repeat this braiding process with the other side, ensuring a secure and even braid.
-
Shaping the Challah – The Top Braid: Now, take the set-aside one-third of the dough. Cut this portion into 3 equal pieces. Roll each of these smaller pieces out to be 13 to 15 inches long. Repeat the braiding method as described above for the smaller ropes. Once braided, this smaller braid will be placed on top of the larger, base braid.
-
Assembling and Second Rise: Lightly grease a large half-sheet baking sheet. You can also line it with parchment paper for easier cleanup. Carefully place the larger braided challah onto the baking sheet, positioning it sideways from corner to corner. Then, gently place the smaller braided challah on top of the larger one. Allow the assembled challah to rise again until it is almost double in size. This second rise is crucial for a light and airy texture.
-
Preparing the Glaze and Baking: While the challah is undergoing its second rise, prepare the glaze. In a small bowl, whisk together the egg yolks, water, and salt until well combined. Once the challah has nearly doubled in size, gently brush the entire loaf with the egg wash using a pastry brush. This will give the challah its signature golden sheen.
-
Baking the Challah: Preheat your oven to 350°F (175°C). Bake the challah in the preheated oven for 35 to 45 minutes. To prevent the crust from browning too quickly, especially if your oven tends to run hot, loosely cover the loaf with aluminum foil about 15 to 20 minutes into the baking process. The challah is done when it is deep golden brown and sounds hollow when tapped on the bottom.
-
Cooling: Once baked, carefully transfer the challah to a wire cooling rack to cool completely. Allowing it to cool fully ensures the interior structure sets properly and prevents a gummy texture.
Expert Tips & Tricks
- Flour Power: The amount of flour can vary slightly depending on humidity and the type of flour you use. Add flour gradually during kneading until the dough is soft and elastic but not sticky.
- Yeast Activation: Ensure your yeast is fresh and active. If you’re unsure, you can “proof” it by dissolving it in a little warm water with a pinch of sugar. If it foams within 5-10 minutes, it’s good to go.
- Even Braiding: For a visually appealing braid, try to keep your rope thickness as consistent as possible and braid with even tension.
- Oven Variations: Ovens can be finicky. Keep an eye on your challah, especially during the last 10-15 minutes of baking. If it’s browning too quickly, don’t hesitate to loosely tent it with foil.
Serving & Storage Suggestions
Challah is incredibly versatile. It’s delightful served simply on its own, perhaps with a smear of butter or a dollop of jam. It also makes the most exquisite French toast, absorbing custardy goodness beautifully without falling apart. For a truly decadent experience, consider serving it warm with a sprinkle of cinnamon sugar or a drizzle of honey.
To store, once completely cooled, wrap the challah tightly in plastic wrap or place it in an airtight container. It will keep well at room temperature for 2 to 3 days. For longer storage, you can freeze slices or the whole loaf by wrapping it tightly in plastic wrap and then a layer of aluminum foil. It can be frozen for up to 3 months. To reheat, thaw at room temperature or gently warm slices in a toaster oven or a low oven.
Nutritional Information
| Nutrient | Amount per Serving | % Daily Value |
|---|---|---|
| Calories | 231.9 kcal | – |
| Total Fat | 7.3 g | 11% |
| Saturated Fat | 1.3 g | 6% |
| Cholesterol | 76.5 mg | 25% |
| Sodium | 255.9 mg | 10% |
| Total Carbohydrate | 34.9 g | 11% |
| Dietary Fiber | 1.2 g | 4% |
| Sugars | 4.9 g | 19% |
| Protein | 6.2 g | 12% |
(Nutritional information is an estimate and may vary based on specific ingredients and preparation.)
Variations & Substitutions
- Richness Factor: For an even richer challah, substitute all or part of the water with whole milk. This will add a creamy depth to the dough.
- Sweetness Adjustment: If you prefer a less sweet bread, you can slightly reduce the amount of sugar, but be mindful that sugar also contributes to the browning and texture of the bread.
- Flavor Infusions: For a subtle flavor twist, consider adding 1-2 teaspoons of vanilla extract to the wet ingredients or a pinch of ground cinnamon to the dry ingredients.
- Seeds and Spices: Before baking, you can sprinkle the top of the glazed challah with sesame seeds or poppy seeds for added texture and flavor.
FAQs
Q: Why is my challah dough not rising?
A: This is often due to inactive yeast, insufficient rising temperature, or too much salt, which can inhibit yeast activity. Ensure your yeast is fresh and the dough is in a warm, draft-free spot.
Q: Can I make this challah without a stand mixer or bread machine?
A: Absolutely! You can mix and knead the dough by hand. It will require more effort and time, but the results will be just as delicious.
Q: How do I achieve a shiny crust on my challah?
A: The egg yolk and water glaze is key to a beautiful sheen. Applying it just before baking ensures the best shine.
Q: My challah is browning too quickly. What should I do?
A: Loosely tenting the challah with aluminum foil during the last portion of baking is the best way to prevent over-browning while allowing the interior to cook through.
Q: Is it possible to make challah without eggs?
A: While this recipe is specifically designed as a rich egg bread, for an egg-free version, you would need to find a dedicated vegan challah recipe that uses alternative binders and enrichments.
Final Thoughts
There’s a profound satisfaction that comes from baking challah from scratch. The aroma that wafts through your home as it bakes is an invitation to gather, to share, and to savor. This rich, beautifully braided loaf is more than just bread; it’s a labor of love, a tradition made tangible, and a delicious centerpiece for any occasion. I encourage you to embrace the process, enjoy the moments of creation, and share this wonderful bread with those you hold dear. Pair a slice with a cup of warm tea or a glass of milk for simple perfection, or transform it into the most glorious French toast imaginable. Happy baking!