
Rimfire Cheese Balls: A Taste of Queensland Sunshine
There are some dishes that, with just one bite, transport you back to a specific time and place. For me, that’s the Rimfire Cheese Balls. I remember them appearing on a rustic antipasto platter at the Rimfire Winery, nestled in the rolling hills near Toowoomba, Queensland. The late afternoon sun, the scent of eucalyptus in the air, and the delightful tang of these little flavour bombs were a perfect symphony. I was so captivated by their unique flavour and irresistible texture that I simply had to track down the chef and beg for the recipe. Thankfully, they obliged, and these little gems have since become a treasured family favourite, a guaranteed hit at any gathering.
Recipe Overview
- Prep Time: 15 minutes
- Cook Time: 0 minutes (chilling time required)
- Total Time: 15 minutes (plus chilling)
- Servings: 8-10 as part of an antipasto or cheese platter
- Yield: Assorted number of cheese balls
- Dietary Type: Vegetarian
Ingredients
- 125g Philadelphia Cream Cheese, softened
- 1/2 cup tasty cheese, any variety, grated
- 1/4 cup parmesan cheese, freshly grated
- 1/2 teaspoon curry powder, or to taste
- 2 tablespoons mild paprika
Equipment Needed
- Small mixing bowl
- Plate or chopping board
- Plastic container with a lid
Instructions
Embarking on the creation of these Rimfire Cheese Balls is a joyfully simple affair, perfect for those moments when you need a sophisticated yet incredibly easy appetizer. The magic lies in the quality of the ingredients and the simple process that allows their flavours to shine.
- Begin by preparing your flavour base. In a small mixing bowl, combine the softened Philadelphia Cream Cheese, the grated tasty cheese, and the freshly grated parmesan cheese.
- Next, introduce the warming spice. Add the curry powder to the cheese mixture. The quantity here is a delightful dance between subtlety and boldness. Start with the 1/2 teaspoon and then, according to the original instructions, “Add at least enough curry powder to turn the mixture a pale yellow ‘eggy’ colour – and more if you want it to taste really hot.” This is your cue to adjust the spice level to your personal preference. A gentle stir will begin to meld these ingredients.
- Once the curry powder is incorporated, beat the mixture until it is well combined and boasts a relatively smooth consistency. Don’t worry if there are still tiny flecks of cheese; this adds character.
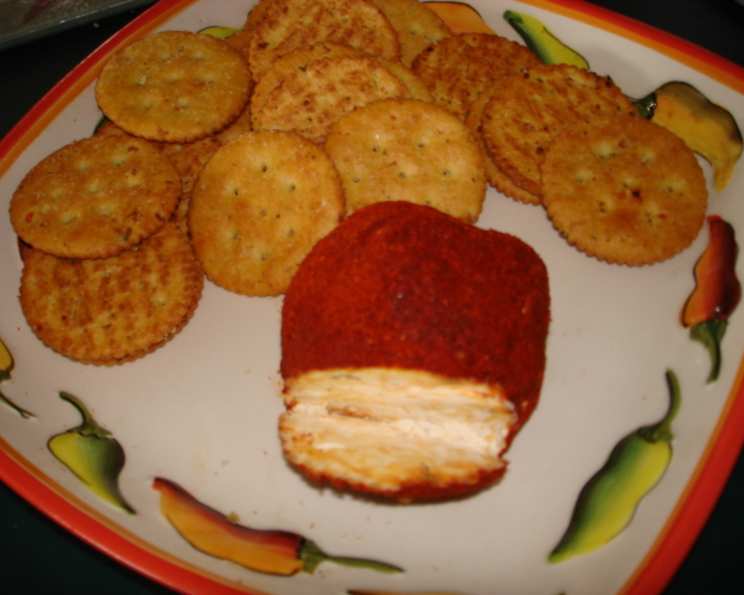
- Now, prepare your paprika coating. Sprinkle 1 tablespoon of the mild paprika onto a plate or chopping board. This will serve as your rolling surface.
- It’s time to shape the cheese balls. Take half of the cheese mixture and, using your hands, gently roll it into a ball. Aim for a consistent size, perhaps about 1 to 1.5 inches in diameter, for an attractive presentation.
- With the ball formed, now roll the ball in the paprika until it is well covered on all sides. Ensure a good, even coating for that signature blush.
- Wash and dry your hands thoroughly. This is crucial to prevent the cheese mixture from becoming too sticky or clumpy on subsequent balls.
- Repeat the rolling and paprika coating process with the rest of the cheese mixture. Continue until all the cheese has been formed into paprika-coated balls.
- To achieve the perfect firm texture and allow the flavours to fully develop, the cheese balls need to chill. Place the cheese balls into a plastic box, cover with a lid, and refrigerate until cold. The original recipe specifies chilling until cold, which typically means at least 30 minutes, but longer is often better for a firmer texture.
Expert Tips & Tricks
The beauty of Rimfire Cheese Balls lies in their simplicity, but a few pro touches can elevate them from delicious to truly memorable.
- Cream Cheese Temperature is Key: Ensure your Philadelphia Cream Cheese is truly softened. If it’s too cold, it will be difficult to mix smoothly with the grated cheeses, leading to a lumpy texture. Leave it out on the counter for about an hour before you start, or gently microwave it in 10-second bursts, stirring in between, until pliable.
- Grate Your Own Cheese: While pre-grated cheese is convenient, grating your own tasty and parmesan cheeses will yield a superior texture and flavour. The anti-caking agents in pre-grated cheese can sometimes affect the smooth meld of the mixture.
- The Curry Powder Nuance: The instruction to add curry powder until the mixture turns “pale yellow ‘eggy’ colour” is your guide. Taste the mixture (before rolling!) as you add the curry powder. This allows you to perfectly calibrate the spice level to your liking. Remember, the flavour will mellow slightly as it chills.
- Paprika Application: For an even, attractive coating, consider using a shallow dish or even a pie plate for your paprika. This gives you more surface area to roll the balls in without them falling off the edge. Gently press the balls into the paprika to ensure good adherence.
- Chilling for Success: Don’t rush the chilling process. This step is vital for the cheese balls to firm up, making them easier to handle and improving their texture. The longer they chill, the more cohesive they become, ensuring they hold their shape beautifully when served.
Serving & Storage Suggestions
These delightful Rimfire Cheese Balls are best served chilled, allowing their flavours to be crisp and refreshing. They are a quintessential component of any antipasto platter or cheese board. Their vibrant colour and intriguing flavour make them a standout.
- Serving: Arrange them artfully amongst crackers, olives, cured meats, and fresh fruit. They pair wonderfully with water biscuits (cheese crackers) as suggested in the original directions, but also stand up beautifully against more robust crackers or even slices of baguette. A glass of crisp white wine or a light-bodied red would be a perfect accompaniment.
- Storage: Once made, Rimfire Cheese Balls should be kept refrigerated. Store them in an airtight container. They will keep well in the refrigerator for 3-4 days. Because they are served cold and contain cream cheese, it is not recommended to leave them at room temperature for extended periods. They are not typically meant for freezing, as the texture of the cream cheese can change upon thawing.
Nutritional Information
Here’s an estimated nutritional breakdown for these flavourful cheese balls. Please note that these are approximate values and can vary based on the specific types of cheese and cream cheese used.
| Nutrient | Amount per Serving (approx. 1 oz/28g) | % Daily Value (approx.) |
|---|---|---|
| Calories | 106 kcal | – |
| Calories from Fat | 83 kcal | – |
| Total Fat | 9.3 g | 14% |
| Saturated Fat | 5.8 g | 28% |
| Cholesterol | 28.6 mg | 9% |
| Sodium | 145.9 mg | 6% |
| Total Carbohydrate | 1.6 g | 0% |
| Dietary Fiber | 0.6 g | 2% |
| Sugars | 0.3 g | 1% |
| Protein | 4.7 g | 9% |
(Note: Daily Values are based on a 2,000 calorie diet. Individual needs may be higher or lower.)
Variations & Substitutions
While the classic Rimfire Cheese Ball recipe is superb, a few simple tweaks can introduce exciting new dimensions.
- Spice Level: If you’re a fan of heat, consider adding a tiny pinch of cayenne pepper along with the curry powder for an extra kick. Alternatively, a very small amount of finely minced fresh chili could be incorporated, though this will alter the smooth texture.
- Herbaceous Notes: For a fresher, more aromatic twist, try adding a tablespoon of finely chopped fresh chives or parsley to the cheese mixture before rolling.
- Different Coatings: While paprika is iconic, experiment with other coatings. Finely chopped toasted nuts (like walnuts or pecans), sesame seeds, or even a blend of herbs and spices could create a unique presentation and flavour profile. Just ensure they are finely chopped for good adhesion.
- Lower Fat Option: For a lighter version, you could experiment with using a light cream cheese and a reduced-fat tasty cheese, though this may slightly alter the texture and richness.
FAQs (Frequently Asked Questions)
Q: Can I make the Rimfire Cheese Balls ahead of time?
A: Absolutely! They are perfect for making a day in advance. Just ensure they are stored in an airtight container in the refrigerator.
Q: What kind of “tasty cheese” is best for this recipe?
A: A good mature cheddar or a Colby-Jack works wonderfully. The key is a cheese that has a good flavour profile and melts well if used in other contexts, ensuring it blends nicely here.
Q: How can I get a thicker coating of paprika on the cheese balls?
A: For a thicker coating, you can dip the cheese ball in the paprika, then lightly moisten your hands with water and roll it again in the paprika. You can also spread a slightly larger amount of paprika on your rolling surface.
Q: My cheese mixture is too sticky to roll. What should I do?
A: Ensure your hands are clean and dry. If it’s still too sticky, place the mixture in the refrigerator for 10-15 minutes to firm up slightly before attempting to roll.
Q: Can I add anything else to the cheese mixture besides the curry powder?
A: Yes, you can add finely chopped herbs like chives or parsley, or a tiny pinch of cayenne pepper for extra heat. Just ensure any additions are finely minced to maintain a smooth rolling texture.
Final Thoughts
The Rimfire Cheese Balls are more than just an appetizer; they are a testament to how simple ingredients, thoughtfully combined, can create something truly special. They evoke sunshine, good company, and the joy of sharing delicious food. I encourage you to try this recipe, to experience the delightful burst of flavour that comes with each bite. Serve them at your next gathering, and watch as they disappear with a speed that will have you reaching for the recipe card again in no time. They’re perfect for a casual afternoon with friends or as an elegant addition to a more formal occasion. Enjoy!