
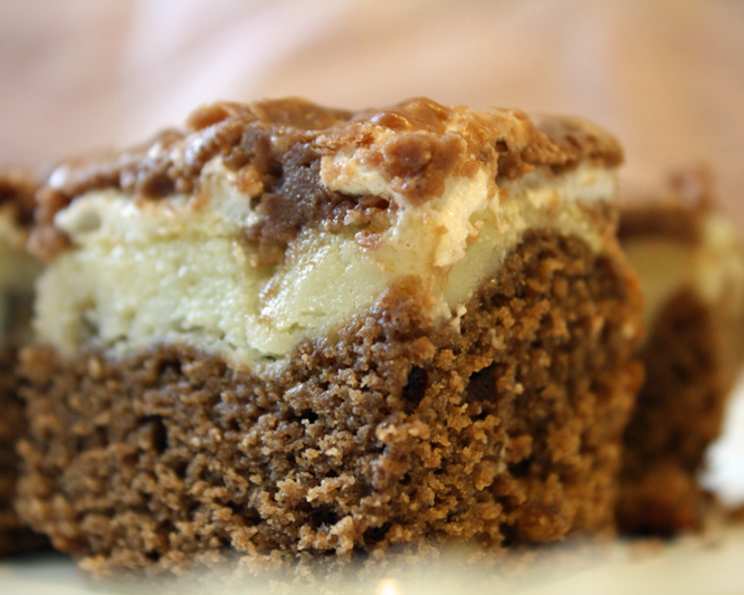
The Quintessential Rocky Road Fudge Bars: A Taste of Family Tradition
There are certain recipes that just feel like home, a warm hug on a plate. This Rocky Road Fudge Bar recipe is precisely that for me. It was a gift, a delicious hand-me-down from my soon-to-be mother-in-law, a woman whose kitchen prowess I deeply admired even before I joined the family. The first time I baked these, the rave reviews flowed as freely as the melted chocolate, and I knew I’d stumbled upon a keeper. Rumor has it, this treasure originated from the hallowed halls of the Pillsbury Bake-Off, and frankly, tasting them, I wouldn’t be surprised. It’s the kind of dessert that brings people together, a sweet testament to shared moments and cherished traditions.
Recipe Overview
- Prep Time: 15 minutes
- Cook Time: 30 minutes
- Total Time: 45 minutes
- Servings: 24 bars
- Yield: 1 9×13 inch pan of bars
- Dietary Type: Contains Dairy, Eggs, Wheat
Ingredients
For the Bars:
- 1/2 cup butter
- 1 cup sugar
- 1/2 to 3/4 cup chopped nuts (walnuts or pecans are classic choices)
- 1 teaspoon vanilla extract
- 1 ounce unsweetened chocolate
- 1 cup flour
- 1 teaspoon baking powder
- 2 large eggs
For the Filling:
- 8 ounces cream cheese, softened (reserve 2 ounces for the frosting)
- 1/2 cup sugar
- 1/4 cup butter, softened
- 1 large egg
- 1/2 teaspoon vanilla extract
- 2 tablespoons flour
- 1/4 cup chopped nuts
For the Frosting:
- 2 cups mini marshmallows
- 1/4 cup butter
- 1 ounce unsweetened chocolate
- 1/4 cup milk
- 1 teaspoon vanilla extract
- 2 ounces cream cheese, softened
- 3 cups powdered sugar
Equipment Needed
- 9×13 inch baking pan
- Large saucepan
- Small bowl
- Whisk or electric mixer
- Rubber spatula
- Cooling rack
- Measuring cups and spoons
Instructions
- Preheat and Prepare: Begin by heating your oven to 350°F (175°C). Next, grease a 9×13 inch baking pan. This will ensure your bars don’t stick and will come out cleanly.
- Crafting the Bar Base: In a large saucepan, combine the 1/2 cup butter and 1 ounce unsweetened chocolate. Place the saucepan over low heat and stir gently until the butter and chocolate are completely melted and smooth. It’s crucial to use low heat to prevent scorching the chocolate.
- Incorporating Remaining Bar Ingredients: Once the butter and chocolate are melted, add the remaining bar ingredients to the saucepan: 1 cup sugar, 1/2 to 3/4 cup chopped nuts, 1 teaspoon vanilla, 1 cup flour, 1 teaspoon baking powder, and 2 large eggs. Stir everything together until just combined. Don’t overmix.
- Spreading the Base: Carefully spread this batter evenly into the prepared 9×13 inch pan. Use a spatula to ensure an even layer.
- Whipping Up the Filling: In a small bowl, combine all the ingredients for the filling, except for the nuts and chocolate chips. This includes 8 ounces of softened cream cheese, 1/2 cup sugar, 1/4 cup softened butter, 1 large egg, 1/2 teaspoon vanilla extract, and 2 tablespoons flour.
- Beating the Filling: Using a whisk or an electric mixer, beat these filling ingredients for one minute at medium speed until they are smooth and well combined.
- Adding Texture to the Filling: Gently stir in the 1/4 cup chopped nuts into the filling mixture.
- Layering the Filling: Spread this creamy filling mixture evenly over the bar mixture that’s already in the pan.
- The Rocky Road Touch: Sprinkle 6 ounces of semi-sweet chocolate chips evenly over the top of the filling layer.
- First Bake: Place the pan in the preheated oven and bake at 350°F (175°C) for 25 to 35 minutes. You’ll know it’s ready when a toothpick inserted into the center of the bars comes out clean.
- Marshmallow Magic: While the bars are still warm from the oven, sprinkle the 2 cups of mini marshmallows evenly over the top.
- Quick Second Bake: Return the pan to the oven for 2 minutes longer, just until the marshmallows begin to puff up and become slightly melty. Keep a close eye on them to prevent burning.
- Preparing the Luscious Frosting: While the marshmallows are doing their thing, prepare the frosting. In a large saucepan, melt the remaining 1/4 cup butter, 1 ounce unsweetened chocolate, 1/4 cup milk, and the 2 ounces of reserved cream cheese over low heat. Stir continuously until everything is smooth and fully incorporated.
- Finishing the Frosting: Remove the saucepan from the heat. Stir in the 3 cups of powdered sugar and 1 teaspoon vanilla extract until the frosting is smooth and glossy.
- The Grand Finale: Pour the warm frosting over the top of the marshmallow layer. Use a spatula to spread it gently. Then, using a knife or toothpick, swirl the frosting into the melted marshmallows. This creates that beautiful, marbled rocky road effect.
- Chill to Perfection: Allow the bars to cool completely at room temperature, then chill in the refrigerator until firm. This is essential for clean cuts.
- Slice and Serve: Once firm, cut into squares to serve.
Expert Tips & Tricks
- Chocolate Quality: For the best flavor, use good quality unsweetened chocolate. The difference is noticeable in the finished product.
- Room Temperature Ingredients: Ensure your cream cheese and butter for the filling and frosting are truly at room temperature. This will help them blend smoothly and avoid lumps.
- Don’t Overbake the Bars: Overbaking can lead to dry bars. The toothpick test is your best friend here. The filling will continue to set as it cools.
- Marshmallow Watch: Those last two minutes in the oven are critical. Marshmallows can go from perfectly toasted to burnt in a blink.
- Swirling Technique: For a more dramatic swirl, don’t overwork it. A few quick passes with a knife will create beautiful patterns without fully mixing the frosting and marshmallows.
Serving & Storage Suggestions
These Rocky Road Fudge Bars are best served chilled, allowing the layers to set properly. A simple dusting of cocoa powder or a few extra chocolate chips can elevate their presentation. They are perfect on their own, but a dollop of whipped cream or a scoop of vanilla ice cream can make them feel truly decadent.
For storage, these bars are quite forgiving. They can be kept in an airtight container at room temperature for up to 2 days, provided your environment isn’t too warm. However, for optimal freshness and texture, it’s best to store them in the refrigerator for up to a week. They also freeze beautifully; wrap individual bars tightly in plastic wrap, then place them in a freezer-safe container or bag for up to 2 months. Thaw overnight in the refrigerator before enjoying.
Nutritional Information
| Nutrient | Amount per Serving | % Daily Value |
|---|---|---|
| Calories | 333.7 kcal | |
| Total Fat | 18.1 g | 27% |
| Saturated Fat | 10 g | 50% |
| Cholesterol | 60.1 mg | 20% |
| Sodium | 148.2 mg | 6% |
| Total Carbohydrate | 42.1 g | 14% |
| Dietary Fiber | 1.4 g | 5% |
| Sugars | 33.8 g | 135% |
| Protein | 3.9 g | 7% |
| Calories from Fat | 163 g | |
| Calories from Fat (%) | 49% |
Note: Nutritional information is an estimate and may vary based on specific ingredients used.
Variations & Substitutions
While this recipe is a classic for a reason, feel free to experiment!
- Nut Varieties: Pecans, macadamia nuts, or even a mix of your favorite nuts can be used. For a nut-free version, consider omitting them or substituting with toasted sunflower seeds for a bit of crunch.
- Chocolate Chips: Swap the semi-sweet chocolate chips for milk chocolate, dark chocolate, or even peanut butter chips for a different flavor profile.
- Extracts: A touch of almond extract or peppermint extract in the filling can add an interesting twist.
FAQs (Frequently Asked Questions)
Q: Can I make these bars gluten-free?
A: You can try substituting the all-purpose flour with a good quality gluten-free all-purpose flour blend. Results may vary depending on the blend used.
Q: My frosting isn’t smooth. What did I do wrong?
A: Ensure your cream cheese and butter were fully softened before mixing, and that you stirred the powdered sugar in gradually while the mixture was off the heat.
Q: How long do I need to chill the bars before cutting?
A: Chilling until firm is key. This typically takes at least 2-3 hours in the refrigerator, but can vary depending on your fridge’s temperature.
Q: Can I use dark chocolate instead of unsweetened chocolate?
A: You can, but be mindful that it will alter the sweetness and intensity of the chocolate flavor. You might need to adjust the sugar slightly in the bar layer.
Q: What’s the best way to prevent the marshmallows from burning?
A: Keep a very close eye on them during the brief bake. They only need a moment to soften and puff, not to toast heavily.
Final Thoughts
These Rocky Road Fudge Bars are more than just a dessert; they’re a little slice of happiness, a tangible connection to family history and shared joy. They are wonderfully rich, satisfyingly chocolatey, and boast a delightful textural contrast with the crunchy nuts and gooey marshmallows. Bake them for a special occasion, a casual get-together, or simply to treat yourself – I promise, they’ll be met with appreciative smiles. Serve them chilled, perhaps with a steaming mug of coffee or a cold glass of milk, and savor every delightful bite. I’d love to hear how they turn out for you!