
Rosquillas: A Taste of Spanish Sunshine and Aniseed Dreams
There are certain flavors that, for me, are inextricably linked to sunshine and childhood memories, even if those memories are more about the idea of a place than direct experience. Rosquillas, with their delicate crunch, hint of citrus, and unmistakable perfume of anise, fall squarely into that category. They evoke images of sun-drenched plazas, the gentle clinking of ceramic cups, and the joy of simple, yet profoundly satisfying, treats. While I might not have grown up in Spain, the first time I bit into a warm, sugar-coated rosquilla, it felt like unlocking a secret, a delicious whisper from a far-off land. It’s a flavor that’s both comforting and exciting, a testament to how a few humble ingredients can create something truly magical.
Recipe Overview
- Prep Time: 45 minutes
- Cook Time: 15 minutes (for frying)
- Total Time: 1 hour
- Servings: 18
- Yield: 35 doughnuts
- Dietary Type: Contains Eggs, Dairy (Milk)
Ingredients
To craft these delightful Spanish rings, you’ll need:
- 4 large eggs
- 1 cup granulated sugar (plus an additional cup for coating after frying)
- Zest of 2 lemons
- 3 ½ to 4 cups all-purpose flour (you may need slightly more or less depending on humidity)
- 2 tablespoons baking powder
- 4 tablespoons whole milk
- 4 tablespoons extra virgin olive oil (plus additional light-flavored oil for deep frying, such as vegetable or canola oil)
- 2 tablespoons pure anise extract OR 4 tablespoons anise-flavored liqueur (such as Anis del Mono or Sambuca)
Equipment Needed
- Large mixing bowls
- Whisk or electric mixer
- Zester or fine grater
- Measuring cups and spoons
- Sturdy spoon or spatula
- Clean kitchen towels or parchment paper
- Rolling pin
- Sharp knife or pizza cutter
- Deep, heavy-bottomed pot or Dutch oven for frying
- Slotted spoon or spider strainer
- Paper towels or a wire rack set over a baking sheet for draining
- Shallow dish or plate for sugar coating
Instructions
The creation of rosquillas is a hands-on process, a journey that transforms simple ingredients into something truly special. Follow these steps with care and you’ll be rewarded with a batch of pure delight.
- Infuse the Oil with Anise: Begin by placing the 4 tablespoons of extra virgin olive oil in a small, dry pan. Add the anise seeds to the oil. Heat this mixture over low to medium-low heat for about 30 to 60 seconds, just until you can smell the fragrant aroma of the anise. Be very watchful; anise seeds can burn quickly. Remove the pan from the heat immediately and allow the oil to cool completely. This step imbues the oil with a subtle, authentic anise flavor.
- Combine Wet Ingredients: In a large mixing bowl, whisk together the 4 large eggs and 1 cup of granulated sugar until the mixture is pale and slightly thickened. Add the zest of the 2 lemons, the anise extract (or liqueur), the 4 tablespoons of whole milk, and the cooled anise-infused olive oil. Whisk everything together until well combined.
- Incorporate Dry Ingredients: Gradually add the flour and baking powder to the wet ingredients. Start with 3 ½ cups of flour, mixing with a sturdy spoon or spatula, or your hands, until a dough begins to form. Continue adding flour, a little at a time, until the dough is firm and no longer sticky to the touch. If the dough feels too dry, you can add another tablespoon or two of milk.
- Knead and Shape: Turn the dough out onto a lightly floured surface. Knead the dough for about 5-7 minutes until it is smooth and elastic. It should be firm but pliable. Once kneaded, you can begin shaping your rosquillas. Roll the dough out to about ½ inch thickness. Using a small round cutter (like a biscuit cutter) and a smaller one for the center (like a dime or nickel), cut out your doughnut shapes. Alternatively, you can roll small pieces of dough into ropes and form them into rings, ensuring the opening is large enough to allow for expansion during frying. Place the shaped rosquillas on a clean kitchen towel or parchment paper, ensuring they don’t touch, and let them rest for about 10-15 minutes.
- Heat the Frying Oil: While the rosquillas are resting, pour enough light-flavored oil into a deep, heavy-bottomed pot or Dutch oven to come about 2-3 inches up the sides. Heat the oil over medium-high heat until it reaches approximately 350°F (175°C). If you don’t have a thermometer, you can test the oil by dropping a tiny piece of dough into it; it should sizzle immediately and float to the surface.
- Fry the Rosquillas: Carefully, in batches, lower the shaped rosquillas into the hot oil using a slotted spoon or spider strainer. Do not overcrowd the pot, as this will lower the oil temperature and result in greasy rosquillas. Fry them for about 1 to 2 minutes per side, or until they are a beautiful golden brown.
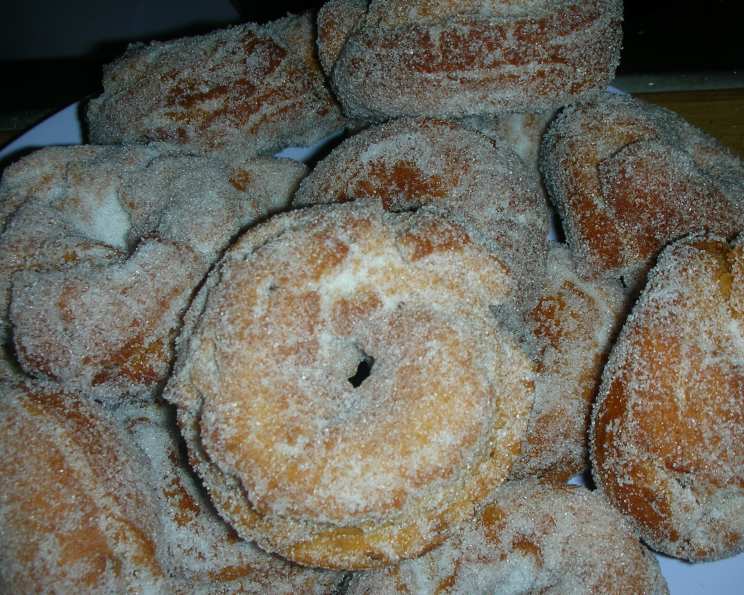
- Drain and Coat: Using your slotted spoon or spider strainer, remove the fried rosquillas from the oil and place them on a wire rack set over a baking sheet, or on a plate lined with paper towels, to drain any excess oil. While they are still warm but not piping hot, prepare your second cup of granulated sugar in a shallow dish. Gently roll each drained rosquilla in the sugar until evenly coated.
- Serve and Store: Allow the rosquillas to cool slightly before enjoying. They are best when fresh, but can be stored in an airtight container at room temperature.
Expert Tips & Tricks
- The Anise Infusion is Key: Don’t skip the step of gently infusing the olive oil with anise seeds. This provides a depth of flavor that anise extract alone might not achieve. Watch it like a hawk to prevent burning.
- Dough Consistency: The flour quantity can vary. The goal is a dough that’s firm enough to hold its shape but not so dry that it’s crumbly. If it feels too sticky after adding the initial flour, add more in small increments. If it feels too stiff, a tablespoon of milk can help.
- Frying Temperature Control: Maintaining the correct oil temperature is crucial for perfectly cooked rosquillas. Too cool, and they’ll absorb too much oil; too hot, and they’ll brown too quickly on the outside, leaving the inside undercooked. A kitchen thermometer is a worthwhile investment for frying.
- Sugar Coating Technique: Rolling the warm rosquillas in sugar allows the sugar to adhere better and creates a lovely, slightly crisp coating. Ensure they are warm enough to melt the sugar slightly, but not so hot that you burn your fingers.
Serving & Storage Suggestions
Rosquillas are a wonderfully versatile treat. They are fantastic served on their own with a strong coffee or a glass of sweet wine. For a more decadent presentation, consider serving them with a dollop of whipped cream or a side of fresh fruit. They are particularly delightful during festive occasions or as a sweet ending to a meal.
Store cooled rosquillas in an airtight container at room temperature for up to 3-4 days. They tend to soften slightly over time, but are still delicious. If you find they’ve become a bit soft, you can briefly refresh them in a low oven (around 250°F / 120°C) for a few minutes, though this is rarely necessary if stored properly. Freezing is not recommended as it can negatively impact their texture.
Nutritional Information
| Nutrient | Amount per Serving | % Daily Value |
|---|---|---|
| Calories | 181.4 kcal | |
| Calories from Fat | 40 g | |
| Total Fat | 4.5 g | 6% |
| Saturated Fat | 0.9 g | 4% |
| Cholesterol | 47.5 mg | 15% |
| Sodium | 138.9 mg | 5% |
| Total Carbohydrate | 30.4 g | 10% |
| Dietary Fiber | 0.7 g | 2% |
| Sugars | 11.4 g | 45% |
| Protein | 4 g | 8% |
(Note: Nutritional values are estimates and can vary based on specific ingredients and portion sizes.)
Variations & Substitutions
While the classic rosquilla is a thing of beauty, feel free to experiment!
- Citrus Twist: Instead of lemon zest, try the zest of an orange for a different citrus note.
- Seedless: If you’re not a fan of anise seeds, you can omit them from the oil infusion step, relying solely on the extract or liqueur for flavor.
- Gluten-Free: Creating a gluten-free version would require significant recipe adaptation with alternative flours and binders, and is beyond the scope of this classic recipe.
- Liqueur Choice: If you prefer a less potent anise flavor, use a milder anise-flavored liqueur or stick with the pure extract.
FAQs
Q: Can I make rosquillas without anise extract or liqueur?
A: While the anise flavor is characteristic of rosquillas, you could make them without it, but they would essentially be plain fried doughnuts. You could enhance the flavor with lemon or orange zest, or a touch of vanilla extract.
Q: My rosquillas are absorbing too much oil. What did I do wrong?
A: This usually happens if your frying oil is not hot enough. Ensure it reaches at least 350°F (175°C) before adding the doughnuts. Also, avoid overcrowding the pot.
Q: How do I get them to be perfectly round?
A: Rolling the dough evenly and using consistent-sized cutters will help. If shaping by hand, try to make smooth, even ropes and carefully join the ends to form a ring.
Q: Can I use a different type of flour?
A: All-purpose flour is recommended for its balance of protein and gluten. While some all-purpose gluten-free blends might work with adjustments, it’s not a simple substitution.
Q: How long does the dough keep before frying?
A: It’s best to fry the rosquillas soon after shaping. Leaving the shaped dough out for too long can cause it to dry out, affecting the texture.
Final Thoughts
Rosquillas are more than just a sweet treat; they are a small piece of culinary heritage, a testament to the simple pleasures that can be found in well-loved recipes. They invite you to slow down, to engage your senses, and to share something delicious with those you care about. I encourage you to try your hand at making them. The aroma that fills your kitchen as they fry, the satisfying crunch, and the sweet embrace of sugar will undoubtedly transport you, much like they do me, to a place of pure, unadulterated joy. Pair them with a Spanish café con leche or a crisp, chilled glass of Cava for an experience that truly sings. Enjoy!