
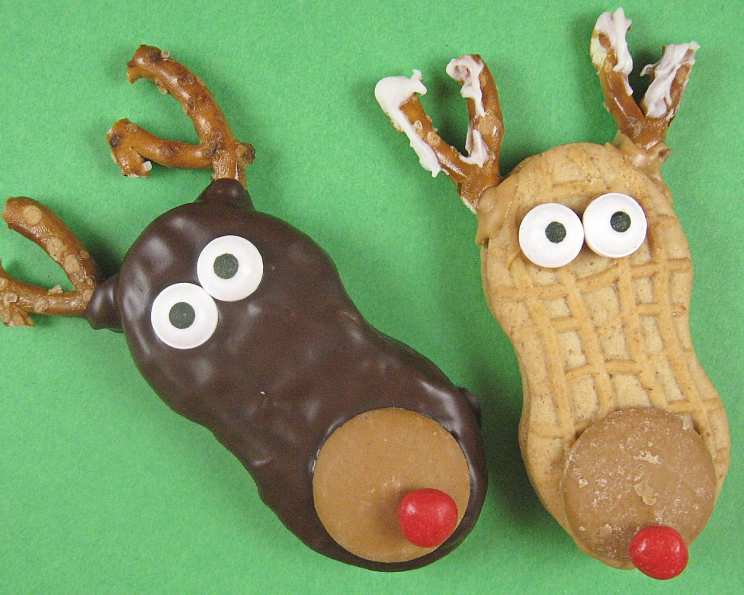
Rudolph the Red-Nosed Reindeer Cookies: A Touch of Holiday Magic
There’s something truly special about recreating the magic of childhood holidays in the kitchen, and for me, it always comes back to the iconic Rudolph. I remember as a child, clutching a worn copy of the storybook, the anticipation of seeing Rudolph’s glowing nose was almost unbearable. Now, as a chef and writer, I find immense joy in translating that pure, unadulterated holiday spirit into edible form. These Rudolph cookies are more than just a sweet treat; they are a tangible piece of festive nostalgia, a way to bring that beloved character to life for little hands and hearts, and a delightful addition to any Christmas gathering that’s sure to be the star of the show.
Recipe Overview
- Prep Time: 15 minutes
- Cook Time: 33 minutes
- Total Time: 48 minutes
- Servings: 32 cookies
- Yield: 32 cookies
- Dietary Type: Vegetarian
Ingredients
- For the Rudolph Construction:
- 1 (16 ounce) package Nutter Butter sandwich cookies
- 4 ounces chocolate-flavored candy coating
- 96 thin pretzel sticks
- 64 miniature M&M baking bits (blue, green, or brown for eyes)
- 32 cinnamon red cinnamon candies or 32 red miniature M&M baking bits (for the nose)
Equipment Needed
- Microwave-safe dish for melting chocolate
- Spoon or spatula for stirring
- Serving platter or parchment-lined baking sheet for assembly
- Optional: Icing bag with piping tip for attaching embellishments
Instructions
Creating these charming Rudolph cookies is a straightforward yet enchanting process that’s perfect for involving little ones. The magic lies in transforming simple ingredients into recognizable holiday characters.
-
Prepare the Chocolate Coating: Begin by placing the chocolate-flavored candy coating into a small glass dish. Microwave this on high power for precisely 3 minutes, stirring the chocolate once during this time. This gentle heating ensures the coating melts smoothly without scorching. If the chocolate isn’t fully melted after 3 minutes, continue microwaving in 30-second intervals, stirring between each, until completely smooth and fluid.
-
Construct the Antlers: Take two pretzel sticks and dip one end of each into the melted chocolate-flavored candy coating. Immediately, carefully adhere these dipped ends to the top of each Nutter Butter sandwich cookie, forming the large, distinctive antlers of Rudolph. Ensure the chocolate acts as the “glue” to hold them in place.
-
Add Additional Antler Detail: For more intricate antlers, break one pretzel in half. Dip one of the broken ends into the melted chocolate coating. Position this chocolate-dipped pretzel half next to the longer pretzel sticks already attached to the cookie, further enhancing the antler shape. This adds a bit more dimension and visual interest to the antlers.
-
Create Rudolph’s Eyes: Now, let’s bring Rudolph’s face to life. Take a miniature M&M baking bit (choose from blue, green, or brown as indicated). Dip one side of the M&M into the melted candy coating. Gently place the M&M, coated side down, onto the Nutter Butter cookie where you envision the eyes. Repeat this process for the second eye, ensuring they are positioned symmetrically. The melted coating will help them adhere firmly.
-
The Iconic Red Nose: The pièce de résistance is Rudolph’s famous red nose! Take a cinnamon red cinnamon candy or a red miniature M&M baking bit. Dip one side of this red candy into the candy coating. Carefully place it onto the front of the Nutter Butter cookie, just below the eyes, with the coated side down. This vivid red nose is the final touch that makes these cookies instantly recognizable and utterly delightful.
Expert Tips & Tricks
As a chef, I always look for ways to streamline the process and elevate the final presentation, even with simple cookies. Here are a few insights for your Rudolph creations:
- Tempering the Chocolate (A Chef’s Secret): While the recipe calls for simple melting, if you find your candy coating is dull or prone to blooming (those white streaks), consider a quick tempering process. After melting, cool the chocolate slightly, then reheat gently until it’s just fluid. Alternatively, you can add a small amount of vegetable oil (about 1 teaspoon per ounce of coating) to help it melt more smoothly and stay fluid longer.
- Working in Batches: The chocolate coating can set relatively quickly, especially in a cooler kitchen. I find it helpful to melt only half of the chocolate-flavored candy coating at a time, and then melt the second half once the first batch is nearly used up. This ensures you always have fluid chocolate for dipping and adhering.
- Prepping Your “Canvas”: Before you start dipping and attaching, have all your Nutter Butter cookies lined up on a clean surface, perhaps a parchment-lined baking sheet. Also, have your pretzel sticks, M&Ms, and red candies within easy reach. This organized approach allows for a smooth workflow.
- Drying Station: Set up a designated “drying station” with parchment paper. As you finish each Rudolph cookie, place it carefully on the parchment to set. This prevents them from sticking to your work surface.
- For a Professional Finish: If you’re aiming for a particularly neat look or are making a large batch, consider using an icing bag with a small round tip to apply the melted chocolate for sticking the elements. This gives you more control and precision. A stiff buttercream frosting, tinted to match the eye or nose color, can also work as an adhesive and dries harder than some melted chocolates, making it a great alternative for attaching the eyes and nose, especially for a firmer hold.
Serving & Storage Suggestions
These Rudolph the Red-Nosed Reindeer Cookies are best served at room temperature, allowing their flavors and textures to be fully appreciated. They make for a fantastic addition to any holiday cookie platter, a delightful treat for a school party, or a sweet surprise in a lunchbox.
To store, ensure the cookies are completely set. Place them in an airtight container, layering with parchment paper between rows to prevent sticking. They will keep well at room temperature for up to 3-4 days, making them perfect for making ahead of your holiday festivities. Avoid storing them in humid conditions, as this can make the Nutter Butter cookies soften. If you need to store them for longer, you can freeze them in a single layer on a baking sheet until solid, then transfer them to a freezer-safe container or bag for up to 1-2 months. Thaw them at room temperature before serving.
Nutritional Information
Here’s an estimated nutritional breakdown for these festive treats. Please note that these values are approximate and can vary based on the specific brands of ingredients used.
| Nutrient | Amount per Serving | % Daily Value |
|---|---|---|
| Calories | 136.3 kcal | |
| Calories from Fat | 42 kcal | |
| Total Fat | 3.5 g | 5% |
| Saturated Fat | 0.8 g | 4% |
| Cholesterol | 0 mg | 0% |
| Sodium | 296.5 mg | 12% |
| Total Carbohydrate | 23.7 g | 7% |
| Dietary Fiber | 0.8 g | 3% |
| Sugars | 5.5 g | 22% |
| Protein | 3.1 g | 6% |
Note: The “Calories from Fat” and “% Daily Value” for fat in the original data were presented in a slightly unusual format. I’ve broken it down into Total Fat, Saturated Fat, and the corresponding % Daily Value for clarity.
Variations & Substitutions
While the classic Rudolph is already a winner, feel free to get creative with these variations:
- White Chocolate Antlers: For a different look and flavor profile, swap the chocolate-flavored candy coating for white chocolate candy coating. This will give Rudolph a slightly more whimsical, snow-dusted appearance.
- Dark Chocolate Delights: If you prefer dark chocolate, you can use dark chocolate candy coating. Be mindful that dark chocolate can be a bit trickier to work with as it can seize more easily.
- Festive Eyes: Beyond the suggested blue, green, or brown M&Ms, consider using tiny black candy pearls or even small dots of black edible food coloring on white candy coating for the eyes.
- Sprinkles Galore: For an extra touch of sparkle and fun, you can lightly dust the chocolate-dipped antlers or the entire cookie with festive edible glitter or colored sanding sugar before the chocolate sets.
- Gluten-Free Rudolph: If you have guests who are gluten-free, you can look for gluten-free sandwich cookies that mimic the Nutter Butter shape. Similarly, ensure your pretzel sticks are certified gluten-free.
- Nut-Free Rudolph: If nut allergies are a concern, you can use a plain sandwich cookie instead of Nutter Butters and ensure your pretzel sticks are nut-free. The eyes and nose options are generally nut-free, but always double-check packaging.
FAQs
Q: How do I prevent the chocolate from hardening too quickly when I’m decorating?
A: Work in a slightly warmer environment, and if needed, you can place your dish of melted chocolate in a bowl of warm (not hot) water to keep it fluid. Also, melting only half the batch at a time helps.
Q: Can I use regular melted chocolate chips instead of candy coating?
A: While you can use regular chocolate, candy coating is generally easier to work with for dipping as it sets harder and more consistently without the need for tempering. If you use real chocolate, you may need to temper it for the best results and shine.
Q: My pretzels broke when I tried to dip them. What went wrong?
A: Ensure you’re using thin pretzel sticks, as they are more pliable. Gently dip them and avoid forcing them. Sometimes, a slight crack can be easily disguised with the chocolate.
Q: How do I get the M&Ms and red candies to stick securely?
A: Make sure you’re dipping the candy into the melted coating and then pressing it onto the cookie while the coating is still wet. The coating acts as the adhesive.
Q: Can I make these cookies ahead of time for a party?
A: Absolutely! These cookies are excellent for making in advance. As mentioned in the storage section, they can be stored at room temperature for several days.
Final Thoughts
There’s a certain alchemy in transforming simple pantry staples into something so whimsical and festive. These Rudolph the Red-Nosed Reindeer Cookies are a testament to that magic, a sweet embodiment of holiday joy that brings smiles to faces young and old. They are an invitation to gather in the kitchen, share laughter, and create cherished memories. Whether you’re looking for a fun activity with the kids, a charming addition to your holiday cookie exchange, or simply a way to spread a little cheer, I encourage you to give these delightful Rudolphs a try. I’d love to hear how your herd turns out, and if you discover any particularly creative eye colors or antler embellishments! Happy baking, and may your holidays be as bright and joyful as Rudolph’s own nose!