
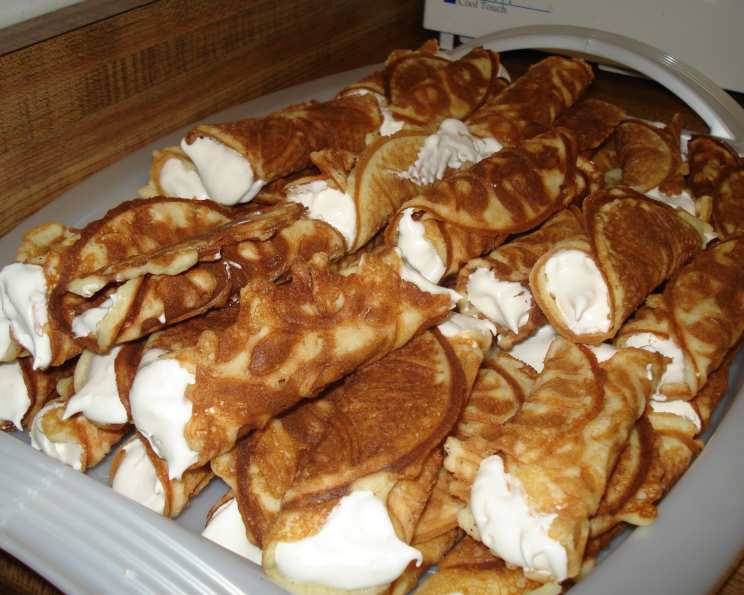
Russian Trubochki: A Delicate Dance of Crisp Pastry and Sweet Cream
There’s a particular kind of magic that happens when a childhood memory crystallizes into a present-day culinary obsession. For me, that magic is embodied in the humble, yet utterly divine, Russian Trubochki. I can still recall the aroma wafting from my grandmother’s kitchen – a sweet, buttery perfume that promised something extraordinary. She’d painstakingly roll warm, golden wafers around metal cones, her fingers moving with a practiced grace I could only admire. The anticipation was almost unbearable, waiting for those delicate, hollow tubes to cool just enough to be filled with a luscious, billowy cream. Each bite was a delightful contrast: the shatteringly crisp, caramelized shell yielding to the velvety sweetness within. It was a treat savored, not gobbled, a testament to the joy found in simple, well-crafted ingredients.
Recipe Overview
- Prep Time: 1 hour 30 minutes
- Cook Time: 30 minutes
- Total Time: 2 hours
- Servings: 50
- Yield: 50 trubochki
- Dietary Type: Vegetarian
Ingredients
For the Cookie Shells:
- 1 cup butter (2 cubes), softened
- 1 cup sugar
- 1 cup all-purpose flour
- 5 large eggs
For the Filling:
- 0.5 (14 ounce) can sweetened condensed milk
- 0.5 (8 ounce) package whipped cream, softened (ensure it’s not overly whipped or stiff)
- 1 (8 ounce) package cream cheese, softened
Equipment Needed
- Pizzelle maker (or a similar waffle/sandwich press that makes thin, crisp cookies)
- Mixing bowls
- Electric hand mixer or stand mixer
- Spatula
- Cutting board
- Two butter knives (or specially designed trubochki molds/cones)
- Oven mitts or heat-resistant gloves
- Cooling rack
Instructions
The creation of trubochki is a multi-stage process that requires patience and a bit of dexterity, but the reward is undoubtedly worth the effort.
- Prepare the Butter Base: Begin by preparing your butter. Cut the 2 cubes of butter into small slices. Place these slices into a microwave-safe bowl and microwave for approximately 45 seconds, or until just softened and pliable. Be careful not to melt it completely into a liquid.
- Cool and Beat Butter: Pour the softened butter into a mixing bowl. Let it cool for about a minute to ensure it’s not too hot to handle with the mixer. Using an electric hand mixer (or a stand mixer with the paddle attachment), beat the butter until it becomes smooth and creamy.
- Incorporate Sugar: Gradually add the 1 cup of sugar to the beaten butter. Continue to beat until the mixture is light, fluffy, and well combined.
- Add Flour and Eggs: Next, add the 1 cup of flour and the 5 large eggs to the bowl. Beat everything together until a smooth, cohesive batter forms. It will be quite liquid.
- Preheat Your Pizzelle Maker: While you prepare the pizzelle maker, ensure it’s properly heated according to its manufacturer’s instructions. Most pizzelle makers require a few minutes to reach the optimal cooking temperature.
- Cook the Cookie Wafers: Drop about 1 tablespoon of batter onto the center of the preheated pizzelle maker. Close the lid and cook for about 90 seconds. The exact cooking time will vary depending on your pizzelle maker, so keep a close eye on them; they cook very fast and go from golden to burnt in a blink. You’re aiming for a pale golden color.
- Shape the Trubochki (The Crucial Step): This is where speed and care are essential. As soon as a wafer is cooked, carefully remove it from the pizzelle maker using a spatula. Immediately, while the wafer is still hot and pliable, place it onto a cutting board. The best method is to center one of the butter knives (handle down) on the hot cookie.
- Roll with Precision: Quickly pull one side of the cookie over the butter knife handle, then immediately pull the other side over, overlapping slightly to form a cone or tube shape. The heat from the cookie will help it adhere to itself.
- Hold the Shape: Flip the entire thing over so that the butter knife is now holding the cookie in its desired shape, preventing it from flattening as it cools.
- Work Quickly: You need to be very quick during this shaping process. If the cookie cools too much, it will become brittle and crack when you try to shape it. If you find your fingers are getting too hot, this is where wearing plastic gloves or using slightly thicker oven mitts can be a lifesaver. The goal is to shape them before they firm up.
- Repeat and Cool: Continue this process with the remaining batter, working in batches. Allow the shaped trubochki to cool completely on a wire rack before attempting to remove them from the butter knife handles. This cooling allows them to become crisp and hold their shape.
- Prepare the Filling: While the cookie shells are cooling, make the filling. In a clean mixing bowl, combine the 0.5 (14 ounce) can of sweetened condensed milk, the 0.5 (8 ounce) package of softened whipped cream, and the 1 (8 ounce) package of softened cream cheese.
- Blend the Filling: Using your electric hand mixer, blend all the filling ingredients until they are smooth, creamy, and well incorporated. Be careful not to overmix, especially if using whipped cream that is already quite stiff, as it can break down.
- Fill the Trubochki: Once the cookie shells are completely cooled and firm, carefully remove the butter knife handles. They should slide out cleanly. Using a spoon or a piping bag (if you have one and the mixture is thick enough), fill each cooled trubochka with the prepared cream filling.
- Refrigerate: Once filled, refrigerate the trubochki for at least 30 minutes to allow the filling to set slightly and the flavors to meld.
A Word of Caution (and Encouragement):
Do not be tempted to eat all the cookies before you finish filling them! Your family will likely be very disappointed if there are no finished trubochki to enjoy. The house will smell of sweet, caramelized goodness for hours, so there’s no escaping the delicious aroma.
Expert Tips & Tricks
- Butter Knife Alternatives: While butter knives are traditional and effective, you can purchase specialized metal cones designed specifically for shaping trubochki. These can make the process a bit easier and more consistent.
- Pizzelle Maker Variations: Different pizzelle makers have different heat outputs and patterns. Familiarize yourself with yours and adjust cooking times accordingly. A lighter color is better for shaping.
- Filling Consistency: If your filling seems too soft to pipe, chill it for about 15-20 minutes before filling. Conversely, if it’s too stiff, let it sit at room temperature for a few minutes.
- Make-Ahead Filling: The cream filling can be made a day in advance and stored in an airtight container in the refrigerator. Give it a quick whisk before filling if it has firmed up too much.
Serving & Storage Suggestions
Trubochki are best served chilled, allowing the creamy filling to be refreshing against the crisp pastry. They make an elegant addition to any dessert spread, a perfect accompaniment to coffee or tea, and a delightful treat for special occasions.
Storage: Store any leftover trubochki in an airtight container in the refrigerator. Due to the cream filling, they are best consumed within 2-3 days. The crispness of the shells will gradually soften over time once filled. If you have unfilled shells, they can be stored in an airtight container at room temperature for up to a week, provided they are completely cool and dry.
Nutritional Information
Here’s an estimated nutritional breakdown per trubochka (this can vary significantly based on exact ingredient brands and portion sizes):
| Nutrient | Amount per Serving | % Daily Value |
|---|---|---|
| Calories | 180 kcal | 9% |
| Total Fat | 10 g | 13% |
| Saturated Fat | 6 g | 30% |
| Cholesterol | 40 mg | 13% |
| Sodium | 60 mg | 3% |
| Total Carbohydrate | 20 g | 7% |
| Dietary Fiber | 0.2 g | 1% |
| Sugars | 15 g | 30% |
| Protein | 3 g | 6% |
Note: These values are estimates and can vary based on specific ingredients used.
Variations & Substitutions
While the classic combination of crisp, buttery shells and sweet cream is undeniably delicious, there’s always room for culinary creativity:
- Chocolate Twist: Melt some dark or milk chocolate and dip the ends of the filled trubochki for an extra layer of decadence.
- Fruity Filling: Fold some finely chopped fresh berries or a swirl of fruit preserves into the cream cheese filling for a burst of flavor and color.
- Nutty Crunch: Toast and finely chop some almonds, pistachios, or walnuts and mix them into the filling or sprinkle them on top for added texture.
- Spiced Cream: Add a pinch of cinnamon or nutmeg to the filling for a hint of warmth, especially delightful during cooler months.
- Alternative Sweeteners: While condensed milk provides a unique richness and sweetness, for a less sweet filling, you could experiment with a base of cream cheese and whipped cream, sweetened with powdered sugar to taste.
FAQs
Q: My pizzelle wafers are cracking when I try to shape them. What am I doing wrong?
A: Ensure you are working quickly while the wafers are still hot and pliable. If they cool too much, they will become brittle. You might also be overcooking them slightly; aim for a pale golden color.
Q: How can I make the shaping process less painful for my fingers?
A: Using thicker oven mitts or wearing heat-resistant gloves can provide better protection. Alternatively, work with a partner so one person can manage the pizzelle maker while the other shapes.
Q: Can I make the trubochki shells ahead of time?
A: Yes, unfilled trubochki shells can be made ahead and stored in an airtight container at room temperature for up to a week. Ensure they are completely cooled and dry before storing to maintain crispness.
Q: My filling seems too soft to hold its shape. What can I do?
A: You can chill the prepared filling in the refrigerator for about 15-20 minutes before filling the trubochki. This will help it firm up slightly.
Q: How long do the filled trubochki last?
A: Filled trubochki are best enjoyed within 2-3 days when stored in an airtight container in the refrigerator. The filling keeps them moist, but the shells will gradually lose their crispness.
These elegant, hollow pastries are a true delight, bridging the gap between a delicate cookie and a rich cream puff. The crisp, caramelized shell, reminiscent of a well-made wafer, provides the perfect vessel for a velvety, sweet filling. They’re a testament to the fact that sometimes, the simplest ingredients, treated with care and a touch of artistry, can create the most memorable of desserts. Enjoy the process, savor the aroma, and most importantly, indulge in the delicious results of your labor.