
The Epitome of Elegance: A Decadent White Chocolate Wedding Cake
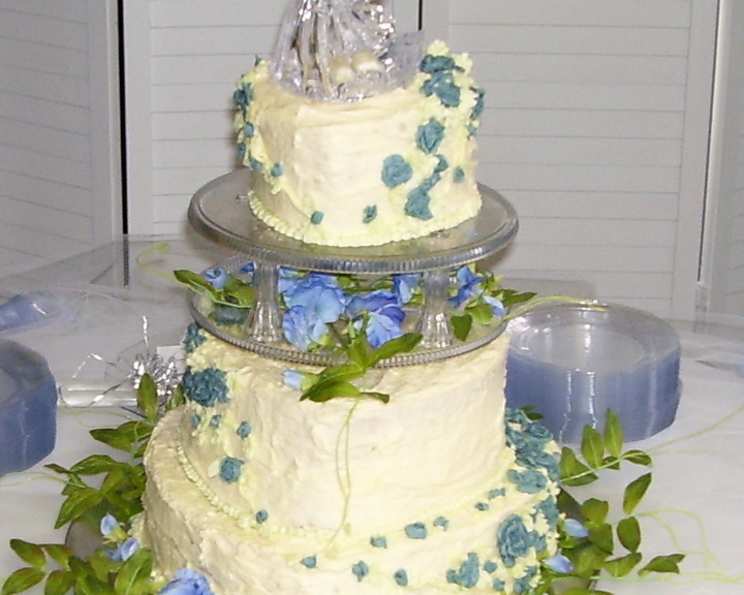
The scent of melting white chocolate, the whisper of vanilla, and the promise of a celebratory occasion – these are the sensory memories that flood my mind whenever I think of this particular wedding cake. It was a profound honor to bake this for my son Michael’s wedding earlier this year. The sheer scale of it – three tiers, gracefully cascading from 14 inches down to a delicate 6 inches – was a testament to the love and joy that filled that day. Paired with a complementary recipe (Recipe #73474, for those who are curious!), it was a centerpiece that not only delighted the eye but also provided a moist, subtly chocolatey, and supremely creamy experience for the hundred guests who gathered to celebrate. It’s a recipe that speaks of meticulous care, a touch of indulgence, and the profound satisfaction of contributing a sweet, edible memory to a monumental life event.
Recipe Overview
- Prep Time: Approximately 1 hour and 30 minutes (plus cooling time)
- Cook Time: 30-45 minutes per batch of layers
- Total Time: Approximately 3 hours (excluding cooling and assembly time)
- Servings: 100
- Yield: A 3-layer cake with layers measuring 14″, 10″, and 6″
- Dietary Type: Can be adapted for dairy-free with substitutions
Ingredients
This recipe requires a generous hand and a focus on quality ingredients to achieve its magnificent scale and delicate flavor.
- 20 cups all-purpose flour
- 8 teaspoons baking soda
- 4 teaspoons baking powder
- 4 teaspoons salt
- 3 lbs white chocolate baking bar, finely chopped
- 4 cups hot water
- 2 cups softened butter (unsalted is preferred for better control over saltiness)
- 2 cups Crisco shortening
- 12 cups white sugar
- 2 dozen large eggs
- 8 cups buttermilk
- 3 tablespoons vanilla extract
Notes on Ingredients:
- White Chocolate: Using a high-quality white chocolate baking bar will yield the best flavor and texture. Avoid chocolate chips, as they often contain stabilizers that can affect melting.
- Buttermilk: The acidity in buttermilk reacts with the leavening agents, contributing to the cake’s tenderness and moistness. If you don’t have buttermilk, you can make a substitute by placing 8 tablespoons of white vinegar or lemon juice in a measuring cup and then adding enough milk to reach the 8-cup mark. Let it sit for 5-10 minutes before using.
Equipment Needed
To tackle a cake of this magnitude, you’ll need some specialized equipment:
- Wilton 14″, 10″, and 6″ cake pans (ensure these are deep enough for generous layers)
- Separator plates for each tier
- Columns (to support upper tiers)
- A sturdy base plate or heavy cardboard base, cut to the shape of your largest cake layer
- 1/4″ dowel rods, cut to the precise depth of your cake layers
- Pastry bags
- Icing decorator tips in various sizes
- A food paste coloring (optional, if you plan to tint icing)
- A bridal cake topper and other non-edible decorations (as desired)
- Large mixing bowls
- Electric mixer (stand mixer recommended for the volume of batter)
- Sifter
- Small saucepan
- Measuring cups and spoons
- Wire cooling racks
- Offset spatula
- A toothpick or cake tester
Instructions
Crafting a wedding cake is a labor of love, and these steps will guide you through creating a stunning and delicious masterpiece.
-
Prepare the Oven and Dry Ingredients: Preheat your oven to 350 degrees F (175 degrees C). In a large bowl, sift together the all-purpose flour, baking soda, baking powder, and salt. Set this dry mixture aside. Sifting ensures that your leavening agents are evenly distributed and helps to create a lighter cake texture.
-
Melt the White Chocolate: In a small saucepan, gently melt the chopped white chocolate with the hot water over low heat. Stir continuously until the chocolate is completely smooth and emulsified. It’s crucial to do this over low heat to prevent scorching. Once melted and smooth, remove from the heat and allow it to cool to room temperature. This step is vital; adding hot chocolate to your batter will cook the eggs and affect the cake’s structure.
-
Cream the Butter, Shortening, and Sugar: In a very large bowl (or the bowl of your stand mixer), cream together the softened butter and Crisco shortening until they are light and fluffy. Gradually add the white sugar, continuing to beat until the mixture is pale and airy. This process incorporates air, which is essential for a tender crumb.
-
Incorporate the Eggs: Add the large eggs one at a time, beating well with each addition. Ensure each egg is fully incorporated before adding the next. This gradual incorporation helps to create a stable emulsion.
-
Combine Wet and Dry Ingredients: Now, you will alternately stir in the flour mixture and the buttermilk. Begin and end with the flour mixture. For example, add about a third of the flour mixture, mix until just combined, then add half of the buttermilk, mix until just combined, and repeat. This method prevents overmixing the flour, which can lead to a tough cake.
-
Add the White Chocolate and Vanilla: Gently stir in the cooled melted white chocolate and the vanilla extract until just incorporated. Be careful not to overmix at this stage. The batter should be smooth and have a beautiful, creamy hue.
-
Prepare the Cake Pans: Grease and flour your 14″, 10″, and 6″ cake pans thoroughly. For extra insurance against sticking, you can also line the bottoms with parchment paper rounds.
-
Divide the Batter: Divide the batter among your prepared pans. The original recipe specifies dividing the batter according to the volume of each pan. A good method for this is to fill each pan with water to the desired level, measure the water’s volume, and then divide your total batter accordingly. Alternatively, if you are using Wilton pans, the volume may be marked on the bottom. Do not fill the pans more than 2/3 full to allow for proper rising. You will likely need to bake in batches, cleaning and re-using pans as necessary to achieve the correct number of layers for each tier.
-
Bake the Cakes:
- Bake the 6″ cakes for 30 to 35 minutes.
- Bake the 10″ cakes for 35 to 40 minutes.
- Bake the 14″ cakes for 40 to 45 minutes.
The cakes are done when a toothpick inserted into the center comes out clean. Keep a close eye on them, as oven temperatures can vary.
-
Cool the Cakes: Allow the cakes to cool in the pans for about 7-9 minutes before carefully inverting them onto wire racks. Let them cool completely before proceeding with frosting. This cooling period is crucial for the cakes to firm up and become stable for handling.
-
Crumb Coat and Assemble Tiers: Once the cakes are entirely cool, brush off any loose crumbs from their surfaces. Apply a thin, even layer of buttercream frosting all over each cake layer. This is known as a crumb coat, and it will seal in any errant crumbs, creating a smooth surface for your final frosting.
- Begin with the 14″ layers. Place them on your large serving platter or the prepared heavy cardboard base.
- Secure the 14″ layer with 5-7 1/4″ dowel rods, cut precisely to the depth of the two cake layers. Insert these dowels in a circular pattern, about 2 inches in from the edge of the cake.
- Carefully place a separator plate on top of the dowel rods.
- Now, place the 10″ cake layers, frosted with buttercream, on top of the separator plate.
- Cut and insert 3-5 dowel rods as before, cut to the depth of the 10″ cake layers, to stabilize these middle layers. Place them in a 5″ circle or matching the shape of the cake.
- Place the 6″ layers on a smaller separator plate, frost them with buttercream, and begin decorating these top layers as desired. Cover lightly with plastic wrap to protect them.
-
Transporting and Final Assembly: The cake can be transferred at this point by carefully wedging the two bottom layers (14″ and 10″) into a box just larger than the serving platter and deeper than the layers. Place the top 6″ layer in a separate cake carrier (a Tupperware or Rubbermaid carrier often works well). Refrigerate the cake until ready to serve. When setting up for the reception, assemble the separator plate with columns on top of the second layer (the 10″ tier) to help settle the top layer securely.
-
Finishing Touches: Have extra icing on hand to repair any decorations that may have shifted during transport. Place the bridal topper on top of the cake. Use fresh or silk flowers or other non-edible decorations as desired to complete the breathtaking presentation.
Expert Tips & Tricks
- Room Temperature is Key: Ensure your butter, eggs, and buttermilk are all at room temperature before you begin. This allows them to emulsify properly, resulting in a smoother batter and a more tender cake.
- Don’t Overmix: Once you start adding the dry ingredients, mix only until just combined. Overmixing develops the gluten in the flour, which can lead to a tough, dense cake.
- Cooling Patience: Resist the urge to frost warm cakes. They need to be completely cool to hold their shape and prevent the frosting from melting.
- Dowel Rod Precision: Measuring your dowel rods precisely to the depth of each tier is crucial for stability. A cake that is not properly supported can shift or even collapse.
- Crumb Coating is Your Friend: Don’t skip the crumb coat! It’s the secret to a perfectly smooth final frosting layer and makes decorating much easier.
- Visual Baking Cues: While the toothpick test is reliable, also observe the edges of the cake. They should start to pull away slightly from the sides of the pan when the cake is nearing doneness.
Serving & Storage Suggestions
This magnificent White Chocolate Wedding Cake is best served at room temperature for optimal flavor and texture. Once assembled, it can be refrigerated for stability during transport. However, bring it back to room temperature for at least 2-3 hours before serving to allow the cake and frosting to soften.
Leftover cake, if any, can be stored in an airtight container. Individual slices will keep well in the refrigerator for 3-4 days. If you need to freeze portions, wrap them tightly in plastic wrap, then in aluminum foil, and store in a freezer-safe container for up to 2 months. Thaw overnight in the refrigerator before bringing to room temperature.
Nutritional Information
(Note: This is an estimated nutritional breakdown for a standard serving and will vary based on specific ingredients and frosting used.)
| Nutrient | Amount per Serving | % Daily Value |
|---|---|---|
| Calories | 350.7 kcal | 18% |
| Total Fat | 13.6 g | 20% |
| Saturated Fat | 6.5 g | 32% |
| Cholesterol | 57.1 mg | 19% |
| Sodium | 282.7 mg | 11% |
| Total Carbohydrate | 52.3 g | 17% |
| Dietary Fiber | 0.7 g | 2% |
| Total Sugars | 33.2 g | 132% |
| Protein | 5.4 g | 10% |
Variations & Substitutions
While this recipe is designed for a classic white chocolate experience, a few adjustments can personalize it further:
- Citrus Zest: For a brighter flavor profile, add the zest of one lemon or orange to the batter along with the vanilla extract.
- Mocha Twist: Incorporate a tablespoon or two of instant espresso powder into the melted white chocolate mixture for a subtle mocha undertone.
- Dairy-Free Adaptation: To make this cake dairy-free, you can experiment with a high-quality dairy-free white chocolate substitute, plant-based butter alternative, and a dairy-free milk for the buttermilk. Be sure to choose options that are known to bake well.
FAQs
Q: Can I make the cake layers ahead of time?
A: Yes, you can bake the cake layers a day or two in advance. Once completely cooled, wrap them tightly in plastic wrap and store them at room temperature. This allows you to focus on frosting and assembly closer to the event.
Q: How do I ensure my white chocolate doesn’t seize when melting?
A: The key is to use gentle heat and avoid any contact with water. Melting over a double boiler or very low heat and ensuring your saucepan and utensils are completely dry will prevent seizing.
Q: What kind of frosting pairs best with this cake?
A: A classic vanilla buttercream or a cream cheese frosting are excellent choices that complement the white chocolate beautifully. A Swiss meringue buttercream would offer a lighter, more elegant texture.
Q: My cake seems to have sunk in the middle. What might have gone wrong?
A: This can happen if the oven door was opened too early during baking, the batter was overmixed, or the leavening agents were not fresh. Ensure your baking powder and soda are active and avoid opening the oven door until the cake is nearly done.
Q: How many servings does this cake truly yield?
A: This recipe is designed to serve approximately 100 guests, assuming standard wedding cake serving sizes.
Final Thoughts
This White Chocolate Wedding Cake is more than just a dessert; it’s a symbol of love, a centerpiece of celebration, and a delicious memory etched in time. The delicate balance of sweetness and moisture makes it a crowd-pleaser that will leave your guests reminiscing long after the last crumb has disappeared. Whether you’re baking it for a cherished loved one or a discerning client, the care and attention that goes into this recipe are sure to shine through. Gather your ingredients, embrace the process, and create something truly magical.