
The Sunshine of Sponge: A Delicate Yellow Cake Meets Earl Grey’s Enchantment
There are certain flavor pairings that, once experienced, lodge themselves permanently in your culinary memory. For me, the gentle, almost ethereal sweetness of a perfectly executed yellow sponge cake has always held a special place. It’s a canvas, a whisper of vanilla and buttery goodness, that begs for something more complex, something that dances on the palate. And what could be a more sophisticated partner than the bergamot-kissed, comforting aroma of Earl Grey tea, transformed into a silken pastry cream? I first encountered this delightful combination on a rainy afternoon in a small Parisian pâtisserie, the air thick with the scent of butter and brewing tea. That first bite was a revelation – the airy crumb of the cake yielding to the intensely flavored, yet surprisingly light, cream. It was a moment of pure culinary bliss, a feeling I’ve strived to recapture and share ever since.
Recipe Overview
- Prep Time: 1 hour 20 minutes
- Cook Time: 30 minutes
- Total Time: 1 hour 50 minutes (plus chilling time for pastry cream)
- Servings: 16
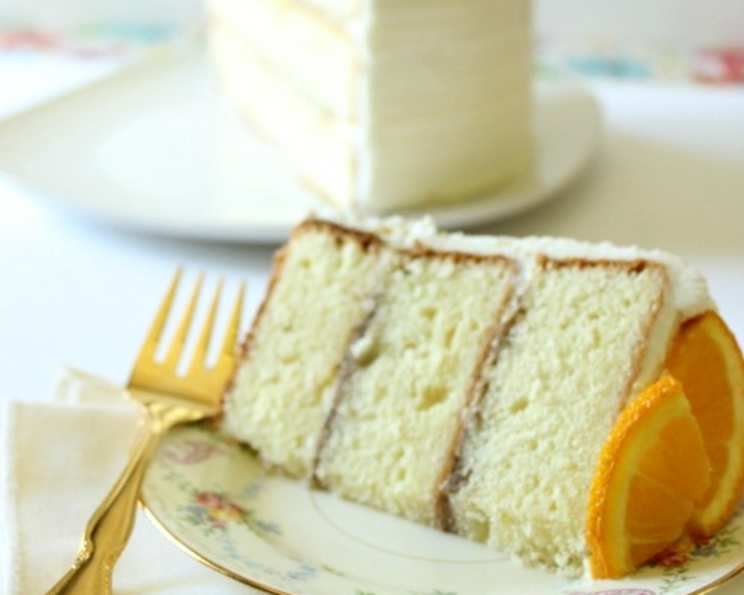
- Yield: 3-layer 8″ cake
- Dietary Type: Contains Gluten, Dairy, Eggs
Ingredients
For the Yellow Sponge Cake:
- 3 cups cake flour
- 1 teaspoon fine sea salt
- 3/4 teaspoon baking soda
- 3/4 cup unsalted butter, cold and cut into cubes
- 1 3/4 cups granulated sugar, divided
- 1 teaspoon vanilla extract
- 7 large eggs, separated
- 1/4 teaspoon cream of tartar
- 1 cup sour cream
- 2 tablespoons sour cream
For the Earl Grey Pastry Cream:
- 3 cups whole milk
- Seeds of 1 vanilla bean
- 3 tablespoons Earl Grey tea leaves
- 3/4 cup granulated sugar
- 2 large eggs
- 8 large egg yolks
- 3/8 cup cornstarch (plus 2 tablespoons)
- 3/8 cup unsalted butter, cubed
- 3/8 cup unsalted butter, cubed (additional for finishing)
Equipment Needed
- Three 8″ round cake pans
- Parchment paper
- Stand mixer with paddle and whip attachments
- Large mixing bowl
- Medium saucepan
- Large bowl
- Whisk
- Fine-mesh sieve
- Shallow dish
- Cooling rack
Instructions
-
Prepare the Cake Pans: Preheat your oven to 350°F (175°C). Lightly grease three 8″ round cake pans with non-stick cooking spray and line the bottoms with parchment paper rounds. Once the parchment is in place, lightly grease the tops of the paper as well. This double greasing ensures your delicate cakes will release effortlessly.
-
Combine Dry Ingredients: In a medium bowl, sift together the cake flour, fine sea salt, and baking soda. Set this mixture aside. Sifting ensures a lighter, airier cake texture by aerating the flour and removing any clumps.
-
Cream Butter and Sugar: In the bowl of your stand mixer, fitted with the paddle attachment, cream together the cold, cubed unsalted butter and 1 1/2 cups of the granulated sugar. Beat on medium-high speed until the mixture is smooth and there are no visible lumps of butter remaining. This process incorporates air, which is crucial for a tender cake.
-
Incorporate Eggs and Vanilla: Add the vanilla extract and 7 large egg yolks to the creamed butter and sugar mixture. Mix until just combined, scraping down the sides of the bowl as needed to ensure everything is incorporated evenly. Avoid overmixing at this stage; we just want the yolks to blend in.
-
Alternate Dry and Wet Ingredients: Begin adding the sifted dry ingredients and the sour cream to the mixer bowl, alternating between the two. Start and end with the dry ingredients. Add about a third of the dry ingredients, mix on low speed until just incorporated, then add half of the sour cream, mix, and repeat. Continue this process until all dry ingredients and sour cream have been added and the batter is fully combined.
-
Develop Batter Texture: Continue to mix the batter on medium-high speed for an additional 3 to 5 minutes. This extended mixing time helps to develop the batter, making it light and fluffy, which is characteristic of a good sponge cake. Transfer the batter to a large mixing bowl.
-
Whip the Egg Whites: In a clean bowl of your stand mixer, fitted with the whip attachment, beat the remaining 7 egg whites with the cream of tartar and the remaining 1/4 cup of granulated sugar. Beat on high speed until the mixture has tripled in volume and forms soft, but not dry, peaks. The cream of tartar stabilizes the egg whites, allowing them to achieve maximum volume and a glossy appearance.
-
Fold in Egg Whites: This is a delicate step that requires a gentle hand. Gently fold the whipped egg whites into the cake batter in two additions. Use a rubber spatula and a folding motion, cutting down through the center of the batter and bringing it up and over the egg whites. Be careful not to deflate the airy egg whites – we want to maintain that lightness.
-
Bake the Cakes: Spread the batter evenly into the prepared cake pans. Bake in the preheated oven for approximately 30 minutes, or until the cakes are light golden brown and a knife inserted into the center comes out clean. Oven temperatures can vary, so keep a close eye on your cakes during the last few minutes of baking.
-
Cool the Cakes: Once baked, let the cakes cool in their pans on a wire rack for about 20 minutes. Then, carefully turn the cakes out of the pans onto the wire rack to cool completely before frosting. Ensuring they are fully cooled prevents the frosting from melting.
-
Prepare the Earl Grey Pastry Cream: While the cakes are cooling, it’s time to make the star of our filling. In a medium saucepan, bring the whole milk, vanilla bean seeds, Earl Grey tea leaves, and 1/2 cup of the granulated sugar to a boil. Once it reaches a boil, remove from heat, cover, and let the tea steep for 10-15 minutes to infuse the milk with flavor.
-
Whisk Egg Mixture: In a large bowl, whisk together the 2 large eggs, 8 large egg yolks, 3/8 cup cornstarch, and the remaining 1/4 cup granulated sugar until smooth and well combined. This mixture will form the base of your pastry cream.
-
Temper the Eggs: Slowly pour the hot, steeped milk mixture (strained to remove the tea leaves and vanilla bean) over the egg mixture, whisking constantly to temper the eggs and prevent them from scrambling. It’s crucial to do this gradually and whisk continuously.
-
Thicken the Pastry Cream: Return the entire mixture to the saucepan. Cook over low heat, stirring constantly, until the pastry cream thickens and bubbles rise to the surface. This process happens quickly, so do not take your eyes off the pot! Continuous stirring is essential to prevent scorching and ensure a smooth, velvety texture.
-
Finish the Pastry Cream: Remove from heat immediately once thickened. Strain the pastry cream through a fine-mesh sieve into a shallow dish. This step removes any potential lumps, ensuring a silky smooth finish. Add the 3/8 cup of cubed unsalted butter to the hot pastry cream and whisk until it is completely melted and incorporated, adding richness and gloss.
-
Chill the Pastry Cream: Cover the surface directly with plastic wrap. This prevents a skin from forming on top as it cools. Refrigerate until thoroughly chilled and set. This typically takes at least 2-3 hours, or preferably overnight.
Expert Tips & Tricks
- Room Temperature Ingredients: For the cake batter, ensuring your butter and sour cream are at room temperature (but the butter is still cold for the initial creaming) is key. The eggs should also ideally be at room temperature for better emulsion.
- Don’t Overmix the Cake Batter: While we do mix for a few minutes to achieve fluffiness, once the dry ingredients are added, overmixing can develop the gluten too much, resulting in a tougher cake. Stop as soon as it’s combined.
- Gentle Folding is Paramount: The success of your sponge cake hinges on preserving the air incorporated into the egg whites. Fold with patience and a light touch.
- Strain Your Pastry Cream Twice: For an unbelievably smooth pastry cream, consider straining it once into the shallow dish, and then again before you whisk in the final butter.
- Make Ahead Magic: The Earl Grey Pastry Cream can be made a day or two in advance and stored in the refrigerator, allowing flavors to meld further. The sponge cakes can also be baked a day ahead, wrapped tightly, and stored at room temperature.
Serving & Storage Suggestions
To serve this exquisite creation, allow your fully cooled sponge cakes to come to room temperature if they’ve been refrigerated. Place one cake layer on your serving plate. Generously spread a layer of the chilled Earl Grey Pastry Cream over the first cake layer. Top with the second cake layer, then another generous layer of pastry cream, followed by the final cake layer. You can finish the cake with a dusting of powdered sugar, a few fresh berries, or even a drizzle of extra pastry cream.
Leftovers should be stored in an airtight container in the refrigerator. The cake will keep for up to 3 days. Due to the pastry cream, it is not recommended for freezing.
Nutritional Information
| Nutrient | Amount per Serving | % Daily Value |
|---|---|---|
| Calories | 501.1 kcal | 25% |
| Total Fat | 27 g | 41% |
| Saturated Fat | 15.3 g | 76% |
| Cholesterol | 255.4 mg | 85% |
| Sodium | 284.1 mg | 11% |
| Total Carbohydrate | 56.4 g | 18% |
| Dietary Fiber | 0.5 g | 1% |
| Sugars | 34.3 g | 137% |
| Protein | 8.9 g | 17% |
(Note: Nutritional values are estimates and can vary based on specific ingredients and portion sizes.)
Variations & Substitutions
- Gluten-Free Sponge: For a gluten-free version, experiment with a high-quality gluten-free all-purpose flour blend that contains xanthan gum. You may need to adjust the liquid slightly.
- Dairy-Free Pastry Cream: While challenging to replicate the exact richness, you could try using a full-fat coconut milk for the milk base and a plant-based butter alternative. The flavor profile will change significantly.
- Other Tea Infusions: Feel free to experiment with other robust tea blends for the pastry cream, such as Darjeeling, English Breakfast, or even a floral Jasmine tea. Adjust steeping time as needed.
- Citrus Zest: A touch of lemon or orange zest added to the cake batter can complement the bergamot notes of the Earl Grey.
FAQs
Q: Why is my sponge cake dry?
A: Dryness can result from overbaking or using too much flour. Ensure you measure flour accurately by spooning it into the cup and leveling it, and bake only until a cake tester comes out clean.
Q: My pastry cream is lumpy. How can I fix it?
A: If your pastry cream is lumpy, it might be salvageable by vigorously whisking it or straining it through a fine-mesh sieve multiple times. Prevention is key: ensure constant stirring and tempering of the eggs.
Q: Can I make the pastry cream ahead of time?
A: Absolutely! Making the pastry cream a day in advance allows the flavors to meld beautifully and ensures it’s perfectly chilled and set for assembly.
Q: How can I get perfectly even cake layers?
A: Using a kitchen scale for your batter and dividing it evenly among the prepared pans is the most accurate method. You can also use a ruler to check the height of each cake as it bakes.
Q: What’s the best way to store leftover Earl Grey Pastry Cream?
A: Store any leftover pastry cream in an airtight container in the refrigerator for up to 3 days. Ensure it’s covered directly with plastic wrap to prevent a skin from forming.
A Sweet Farewell
This Yellow Sponge Cake with Earl Grey Pastry Cream is more than just a dessert; it’s an experience. It’s the comforting embrace of a familiar cake elevated by an unexpected, sophisticated twist. Each bite offers a delightful interplay of textures and flavors, a testament to the beauty of simple ingredients treated with care. I encourage you to embrace this recipe, to savor the process, and to share the joy it brings with your loved ones. Perhaps serve it with a delicate cup of Earl Grey tea for the ultimate thematic indulgence, or a light, sparkling wine to cut through the richness. I’d be delighted to hear about your culinary adventures with this sunshine-infused treat.