
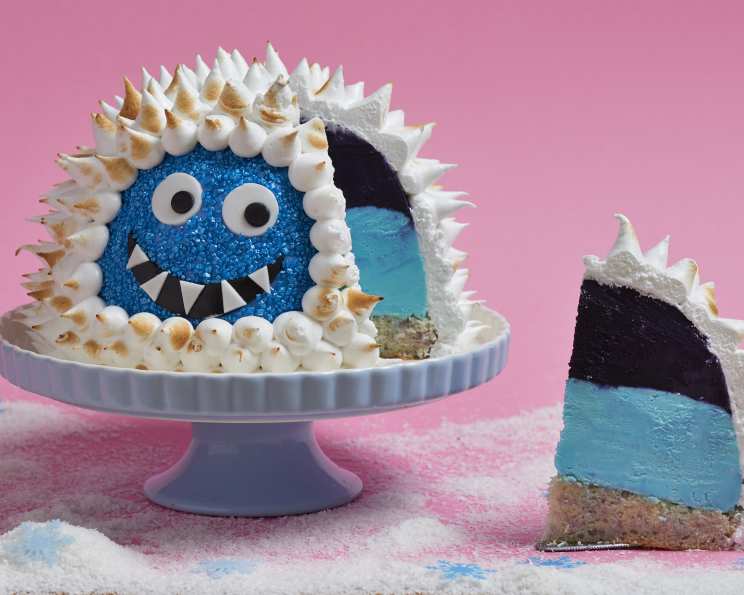
The Yeti Baked Alaska: A Frosty, Fluffy Mountain of Dessert
There are some desserts that transcend mere sweetness; they become an event, a story whispered in sugar and ice. The Yeti Baked Alaska is precisely one of those creations. I remember the first time I encountered it, not in a bustling restaurant kitchen, but as a glorious, slightly intimidating centerpiece at a winter solstice party years ago. The meringue, impossibly puffed and lightly browned, conjured images of snow-capped peaks, and as the chef used a blowtorch to add the final touches, the scent of toasted sugar filled the air, a promise of the magic hidden within. It was a moment of pure culinary theatre, a dessert that looked as wild and wonderful as the mythical creature it was named after.
Recipe Overview
- Prep Time: 70 minutes
- Cook Time: 10 minutes
- Total Time: 1 hour 20 minutes
- Servings: 8-10
- Yield: 1 impressive dessert
- Dietary Type: Dessert
Ingredients
For the Cake Base:
- 1/2 quantity vanilla sponge cake mix (prepared according to package instructions)
- 2 tablespoons purple candy sprinkles
- 2 tablespoons blue candy sprinkles
For the Ice Cream Layers:
- 2 cups purple ice cream (or gelato)
- 2 cups blue ice cream (or gelato)
For the Meringue:
- 4 large egg whites
- 1 cup caster sugar
- 1/3 cup water
- 1 pinch cream of tartar
For Decoration:
- Blue, white, and black fondant icing
- White icing sugar (for dusting)
- Blue sanding sugar
Equipment Needed
- 7” round cake tin
- Baking parchment
- Wire rack
- 2-pint glass bowl
- Plastic wrap
- Sharp knife
- Small saucepan
- Sugar thermometer
- Electric mixer (or whisk)
- Piping bag
- Large round nozzle
- Serving plate
- Brule torch
Instructions
Let’s embark on crafting this spectacular Yeti Baked Alaska, a dessert that’s as much a joy to assemble as it is to devour.
- Prepare the Cake Base: Begin by making the vanilla sponge cake mix according to the instructions on its packaging. Once the batter is ready, gently stir in both the purple candy sprinkles and the blue candy sprinkles. This will create a delightful confetti effect within the cake.
- Bake the Sponge: Grease and line a 7” round cake tin with baking parchment. Pour the prepared cake batter into the tin and bake according to the cake mix instructions. Once baked, transfer the cake to a wire rack and allow it to cool completely.
- Prepare the Bowl for Ice Cream: While the cake cools, prepare your vessel for the ice cream. Double line the base of a 2-pint glass bowl with plastic wrap, ensuring the edges of the wrap extend generously over the sides. This will make it much easier to unmold the ice cream later.
- Layer the Purple Ice Cream: Take the purple ice cream out of the freezer and allow it to soften slightly. This makes it easier to scoop and spread. Spoon the softened purple ice cream into the bottom of the plastic-wrap-lined bowl. Smooth the surface evenly to create a neat layer. Place the bowl in the freezer for at least 2 hours to allow this layer to set firmly.
- Layer the Blue Ice Cream: Once the purple layer is solid, take the blue ice cream and allow it to soften slightly, just as you did with the purple. Spoon this over the set purple layer, smoothing the top so it is level and reaches approximately to the top of the bowl. Return the bowl to the freezer for at least another 2 hours, or until the blue layer is also firmly set.
- Fit the Cake to the Bowl: When your cake has cooled entirely, trim around its edge using a sharp knife so that it fits the diameter of your glass bowl precisely. Gently press this trimmed cake round down onto the top of the set ice cream layers. Return the entire assembly to the freezer to firm up further while you prepare the meringue.
- Create the Yeti’s Face: Now for the whimsical part – crafting the Yeti’s features. Using the blue, white, and black fondant icing, sculpt a face for your Yeti. You can make it friendly or fearsome, as you please! Once sculpted, set the face aside.
- Prepare the Sugar Syrup: In a small saucepan, combine the caster sugar and water. Stir them together until the sugar is dissolved. Fit a sugar thermometer to the side of the pan. Heat the mixture gently over a low heat until it begins to thicken and starts to turn a pale yellow color, reaching exactly 240°F (115.5°C). This is crucial for a stable meringue.
- Whip the Meringue: While the sugar syrup is heating, place the egg whites and the cream of tartar into a clean, dry bowl of your electric mixer. Whisk them together until they form soft peaks. Once the sugar syrup reaches 240°F (115.5°C), carefully and slowly drizzle the hot syrup into the whisking egg whites in a thin, steady stream. Continue whisking the mixture on high speed.
- Achieve Stiff, Glossy Peaks: Keep whisking the meringue until it becomes stiff and glossy. This process will take several minutes. The meringue should hold its shape firmly when you lift the whisk. Once the meringue is ready, spoon it into a piping bag fitted with a large round nozzle.
- Assemble and Decorate the Yeti: Remove the ice cream and cake mold from the freezer. Carefully upturn the entire frozen confection onto a serving plate. Gently peel away the plastic wrap. “Stick” the prepared fondant Yeti face onto the side of the ice cream. Then, begin piping the meringue all over the frozen dessert, creating long, fluffy spikes to mimic the Yeti’s fur. Ensure the meringue completely encases the ice cream and cake.
- Final Freeze and Browning: Return the fully frosted Yeti Baked Alaska to the freezer. Allow it to chill until you are ready to serve.
- Serve and Brown the Meringue: Just before your guests are about to enjoy this magnificent creation, remove it from the freezer. Using a Brule torch, lightly brown the peaks of the meringue. This creates a beautiful contrast of textures and flavors – the warm, caramelized exterior giving way to the icy interior.
Expert Tips & Tricks
- Speed is Key: Once the ice cream is out of the freezer, work quickly to avoid excessive melting. Having all your ingredients and equipment prepped and at hand is vital.
- Meringue Mastery: Ensure your mixing bowl and whisk are scrupulously clean and free of any fat or grease, as this can prevent the egg whites from whipping properly. The cream of tartar helps stabilize the meringue, but precise sugar syrup temperature is paramount.
- The Perfect Ice Cream Consistency: The slight softening of the ice cream is a delicate balance. Too soft, and your layers will be messy. Too firm, and it will be difficult to spread evenly. A good rule of thumb is that it should be scoopable but not dripping.
- Cake Fitting: If your cake dome is too high after baking, don’t fret. Trimming it down to fit the bowl’s rim is perfectly acceptable and ensures a snug fit.
- Fondant Fun: If you’re not confident with fondant sculpting, simple eye and mouth shapes can be cut out with small cutters, or even drawn on with edible food pens.
Serving & Storage Suggestions
The Yeti Baked Alaska is a showstopper and is best served immediately after the meringue has been torched. Slice it with a sharp, hot knife (dipping the knife in hot water and drying it between slices can help). Leftovers, if any, are best stored tightly wrapped in the freezer. However, it is important to note that meringue can weep and lose its crispness over time when frozen, especially once exposed to the air. It’s a dessert designed to be enjoyed fresh!
Nutritional Information
| Nutrient | Amount per Serving | % Daily Value |
|---|---|---|
| Calories | 242 kcal | |
| Calories from Fat | ||
| Total Fat | 7.3 g | 11% |
| Saturated Fat | 4.5 g | 22% |
| Cholesterol | 29 mg | 9% |
| Sodium | 80.8 mg | 3% |
| Total Carbohydrate | 40.7 g | 13% |
| Dietary Fiber | 0.5 g | 1% |
| Sugars | 39.1 g | 156% |
| Protein | 4.1 g | 8% |
Note: Nutritional values are estimates and can vary based on specific ingredients used.
Variations & Substitutions
The beauty of the Yeti Baked Alaska lies in its adaptability.
- Flavor Fusions: Experiment with different ice cream flavors. Mint chocolate chip for a frosty winter feel, or raspberry sorbet for a vibrant contrast.
- Cake Alternatives: Instead of a vanilla sponge, a chocolate or even a gingerbread cake would offer a delightful seasonal twist.
- Meringue Nuances: A hint of almond extract or a touch of food coloring can be incorporated into the meringue for subtle flavor or visual flair.
- Fruity Fun: For a lighter touch, consider adding a thin layer of fruit compote between the ice cream layers or beneath the cake.
FAQs
Q: Can I prepare the Baked Alaska ahead of time?
A: Yes, you can prepare the cake and ice cream layers and freeze them completely. The meringue should ideally be applied and torched just before serving for the best texture.
Q: My meringue is weeping, what did I do wrong?
A: Meringue can weep due to under-whipping, high humidity, or if the sugar syrup was too hot or too cool. Ensure you reach the correct temperature and whip to stiff, glossy peaks.
Q: How do I get the ice cream out of the bowl cleanly?
A: The double lining of plastic wrap is your best friend here. Gently pulling the edges of the wrap should allow the ice cream mold to slide out smoothly.
Q: Can I use store-bought ice cream?
A: Absolutely! High-quality store-bought ice cream or gelato works perfectly. Gelato often provides a denser, richer texture that complements the meringue beautifully.
Q: What if I don’t have a Brule torch?
A: While a torch is ideal for browning, you can carefully use your oven’s broiler. Watch it extremely closely as it can burn very quickly. Place the dessert on a baking sheet and broil for a minute or two, rotating as needed until lightly browned.
The Yeti Baked Alaska is more than just a dessert; it’s an edible adventure, a captivating blend of textures and temperatures that is sure to enchant your guests. May your culinary journey be filled with icy peaks and sugary delights!