
Yummy Refrigerator Dill Pickles: A Taste of Summer Sunshine
There’s something magical about the crunch of a perfectly brined dill pickle, isn’t there? For me, it’s more than just a condiment; it’s a portal to my grandmother’s sun-drenched kitchen, the scent of dill and vinegar hanging heavy in the air. I can still picture her, with flour dusted on her apron, carefully arranging cucumbers in jars, her hands moving with the practiced grace of someone who has bottled sunshine for decades. These refrigerator dill pickles are a direct echo of those cherished memories, a simple yet profound way to capture the essence of a crisp, refreshing bite that transports me back to those warm, happy days.
Recipe Overview
- Prep Time: 15 minutes
- Cook Time: 0 minutes
- Total Time: 25 minutes + 3-4 days chilling
- Servings: Varies by jar size
- Yields: 2-3 jars
- Dietary Type: Vegan, Gluten-Free, Dairy-Free
Ingredients
To create these delightful refrigerator dill pickles, you’ll need the following:
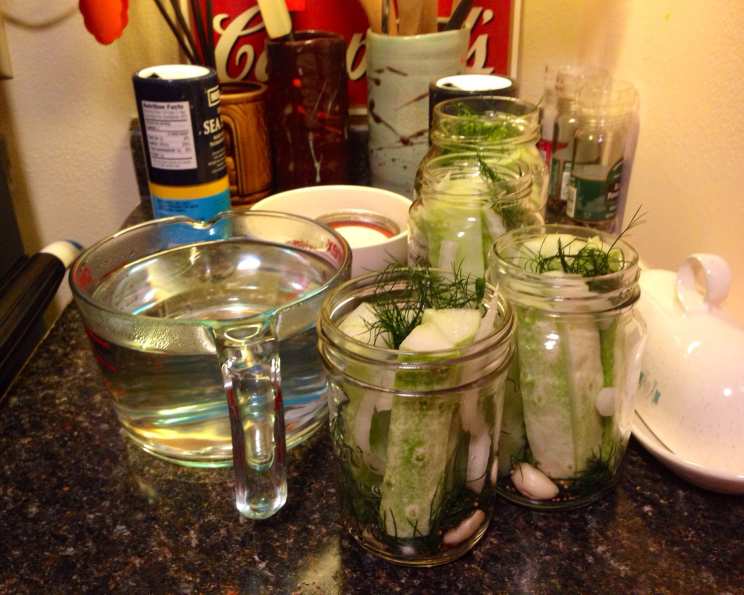
- Pickling Cucumbers: 4 to 9, depending on size and how tightly you pack your jars. Look for small, firm cucumbers specifically labeled for pickling.
- Garlic: 2 to 3 cloves per jar, peeled.
- Grape Leaves: Optional, but they can add a subtle tannic quality that helps keep pickles crisp. Use a few per jar if you have them.
- Fresh Dill: 1 head, separated into a few sprigs per jar. Use the flowering tops for the most intense dill flavor.
- Water: 2 quarts.
- Vinegar: 1 cup. White vinegar or apple cider vinegar both work well, providing the necessary acidity for preservation and flavor.
- Salt: 1/3 cup. Use pickling salt or kosher salt. Avoid iodized table salt, as it can cloud the brine.
- Sugar: 1/4 cup. This balances the acidity and enhances the overall flavor profile.
Equipment Needed
- Large Canning Jars: Two to three, with lids and bands. Ensure they are clean and sterilized if you plan to store them for longer periods. For refrigerator pickles, though, rigorous sterilization isn’t as critical as for shelf-stable canning.
- Medium Saucepan: For preparing the brine.
- Measuring Cups and Spoons: For accurate ingredient measurements.
- Knife and Cutting Board: For prepping garlic and cucumbers if needed.
Instructions
Crafting these pickles is a straightforward process that yields incredibly rewarding results.
-
Prepare Your Jars: Begin by ensuring your canning jars are thoroughly washed and rinsed. For refrigerator pickles, a hot soapy water wash followed by a good rinse is usually sufficient. Make sure the lids and bands are also clean.
-
Build the Flavor Base: In the bottom of each jar, place 2 to 3 cloves of garlic. If you are using grape leaves, add a few to each jar now. Then, tuck in a couple of sprigs of fresh dill.
-
Pack the Cucumbers: Tightly pack the pickling cucumbers into the jars, arranging them vertically or horizontally as they fit best. The goal is to get as many cucumbers into each jar as possible without forcing them to the point of bruising.
-
Prepare the Brine: In a medium saucepan, combine the 2 quarts of water, 1 cup of vinegar, 1/3 cup of salt, and 1/4 cup of sugar.
-
Heat and Dissolve: Place the saucepan over medium-high heat. Stir the mixture continuously until the salt and sugar are completely dissolved.
-
Boil Briefly: Bring the brine to a rolling boil. Once boiling, turn off the heat immediately. This brief boil ensures the salt and sugar are fully incorporated and helps to slightly sterilize the brine.
-
Cool the Brine: Allow the brine to cool for about 10-15 minutes, or until it is no longer steaming hot. It doesn’t need to be completely cold, but it shouldn’t be boiling when you pour it over the cucumbers.
-
Fill the Jars: Carefully pour the cooled brine over the cucumbers in each jar. Ensure that the brine completely covers the cucumbers. If necessary, you can use a smaller jar or a few extra dill sprigs to push down any cucumbers that might be floating. Leave about 1/2 inch of headspace at the top of each jar.
-
Seal and Chill: Securely place the lids on the jars and tighten the bands. Allow the jars to cool at room temperature for a short while, then transfer them to the refrigerator.
-
Allow to Pickle: The magic happens in the fridge! Your refrigerator dill pickles will be ready in 3 to 4 days. The longer they sit, the more the flavors will meld and the more intense the pickle will become.
Expert Tips & Tricks
- Cucumber Selection is Key: For the crispiest pickles, always use fresh, firm pickling cucumbers. Avoid wax-coated varieties or those that feel soft. Wash them thoroughly before use.
- Grape Leaves for Crunch: If you’re serious about crisp pickles, don’t skip the grape leaves! They contain tannins that help preserve the crispness of the cucumbers. Fresh or jarred leaves will work, just rinse them well.
- Don’t Overcrowd: While you want to pack the jars well, avoid damaging the cucumbers. Bruised cucumbers can become soft and mushy during the pickling process.
- Adjust Garlic and Dill: Feel free to adjust the amount of garlic and dill to your personal preference. Some people love a garlicky pickle, while others prefer a more dill-forward flavor.
- Vinegar Choice Matters: White vinegar offers a clean, sharp pickle. Apple cider vinegar will impart a slightly fruitier, warmer note. Experiment to see which you prefer!
Serving & Storage Suggestions
These refrigerator dill pickles are incredibly versatile. They are a fantastic accompaniment to sandwiches, burgers, and barbecued meats. Chop them up and add them to potato salad or tuna salad for a zesty kick. Serve them cold, straight from the jar, with a satisfying crunch.
Storage: Because these are refrigerator pickles and not shelf-stable canned goods, they must be stored in the refrigerator at all times. They will keep for several weeks, typically up to 4-6 weeks, though their quality is best within the first month. As they sit in the refrigerator, the flavors will continue to develop, so don’t be afraid to let them age a bit!
Nutritional Information
Please note that nutritional information can vary based on the size of the cucumbers and the exact ratios used. The following is an estimation:
| Nutrient | Amount per Serving | % Daily Value |
|---|---|---|
| Calories | 127.1 kcal | – |
| Calories from Fat | 0 g | 0% |
| Total Fat | 0 g | 0% |
| Saturated Fat | 0 g | 0% |
| Cholesterol | 0 mg | 0% |
| Sodium | 18875.5 mg | 786% |
| Total Carbohydrate | 27 g | 9% |
| Dietary Fiber | 0.1 g | 0% |
| Sugars | 25.1 g | 100% |
| Protein | 0.4 g | 0% |
Note: The high sodium content is primarily due to the salt used in the brine.
Variations & Substitutions
While this recipe is classic and delicious as is, there are always ways to play with it!
- Spicy Dill Pickles: Add a pinch of red pepper flakes or a sliced jalapeño pepper to each jar for a touch of heat.
- Garlic Dill with a Twist: Experiment with adding other aromatics like a few peppercorns, coriander seeds, or a bay leaf to the jar.
- Bread and Butter Style (Slightly Sweetened): While this recipe is a savory dill pickle, for a sweeter profile, you could slightly increase the sugar and decrease the salt, and perhaps add a few thin slices of onion. However, for true “Bread and Butter” pickles, a different brine ratio and process is typically used.
FAQs
Q: Why are these called “refrigerator pickles”?
A: These pickles are designed to be stored in the refrigerator. They don’t undergo the boiling water bath canning process required for shelf-stable pickles, meaning they rely on refrigeration to prevent spoilage.
Q: Can I use regular cucumbers instead of pickling cucumbers?
A: While you can, pickling cucumbers are recommended. They have a thinner skin and a firmer flesh that results in a much better texture for pickling.
Q: How do I know if my pickles have gone bad?
A: Discard pickles if you notice any mold on the surface, a slimy texture, or a foul odor. A cloudy brine is usually normal, but a frothy or bubbly brine could indicate spoilage.
Q: Can I can these pickles for long-term storage?
A: No, this specific recipe is for refrigerator pickles only. For shelf-stable pickles, you would need to follow a tested canning recipe with precise processing times and temperatures.
Q: My pickles aren’t very crisp. What went wrong?
A: Several factors can affect crispness: using older cucumbers, overcrowding the jars, not using grape leaves, or not using pickling lime (if you choose to use it as an extra measure, though not in this recipe). Ensure your cucumbers are fresh and firm for the best results.
Final Thoughts
There’s a certain satisfaction that comes from making your own pickles, from the simple act of packing jars to the delightful anticipation of that first crisp bite. These refrigerator dill pickles are a testament to that – a quick, easy, and incredibly rewarding project that brings a burst of fresh, tangy flavor to any meal. I encourage you to gather your ingredients, fill your jars, and experience the joy of homemade pickles. They’re not just a delicious addition to your table; they’re a little jar of sunshine, ready whenever you are. Enjoy them with a hearty sandwich, alongside a grilled steak, or simply straight from the jar for a refreshing snack.