
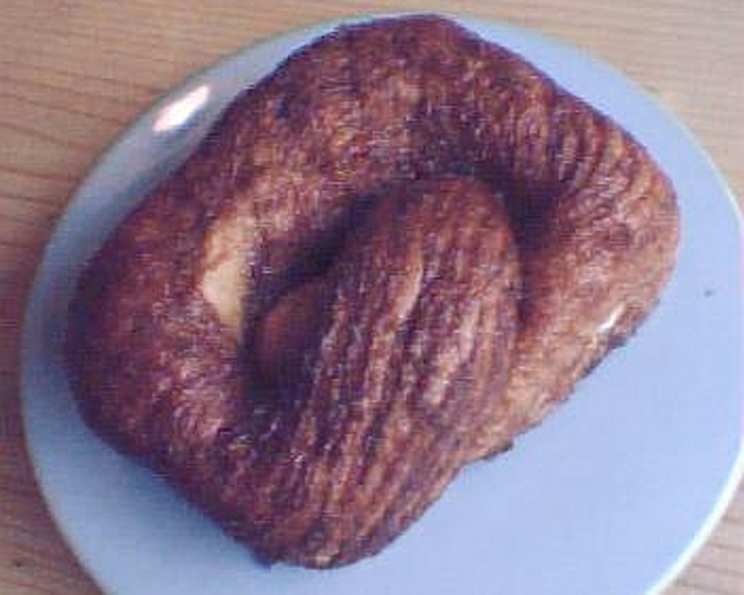
Zeeuwse Bolus: A Taste of Zeeland’s Sticky Sweetness
There’s a particular kind of magic that happens when dough meets treacle, a delightful alchemy that transforms simple ingredients into something truly extraordinary. For me, that magic is embodied in the Zeeuwse bolus. I remember my first encounter with these iconic Dutch pastries on a blustery afternoon in Middelburg. The air was thick with the scent of cinnamon and caramelizing sugar, drawing me into a small bakery where plump, glistening spirals were cooling on racks. Each bite was a revelation – a chewy, yielding dough giving way to a rich, sweet, and warmly spiced center, with that characteristic sticky, almost caramelized crust. It’s a pastry that speaks of comfort, tradition, and the simple pleasure of a well-made treat, a true taste of Zeeland that has stayed with me ever since.
Recipe Overview
- Prep Time: 1 hour 30 minutes (including rising)
- Cook Time: 10 minutes
- Total Time: 1 hour 40 minutes
- Servings: 15
- Yield: 15 bolusses
- Dietary Type: Contains Gluten, Dairy, Egg
Ingredients
Here’s what you’ll need to create these authentic Zeeuwse Bolussen:
For the Dough:
- 500 grams plain flour
- 1 pinch salt
- 250 ml whole milk, lukewarm
- 50 grams yeast, fresh or active dry (if using active dry, proof it in a little warm milk with a pinch of sugar first)
- 75 grams butter, softened
- 1 egg, lightly beaten
For the Coating:
- 250 grams brown sugar
- 2 tablespoons cinnamon
Equipment Needed
- Large mixing bowl
- Small saucepan (for warming milk)
- Measuring cups and spoons
- Baking sheets
- Parchment paper (optional, but recommended for easy cleanup)
- Plastic wrap or damp kitchen towels
- Rolling pin
- Butter knife or offset spatula (optional, for greasing)
Instructions
Let’s embark on the journey of creating your own batch of these beloved Dutch pastries. Follow these steps carefully for the most authentic and delicious results.
-
Prepare the Dough Base: Sift the plain flour into a large mixing bowl and add the pinch of salt. Set aside. Gently heat the whole milk in a small saucepan until it is lukewarm. Be careful not to overheat it; it should feel comfortably warm to the touch.
-
Activate the Yeast: In a small bowl, dissolve the yeast in a little of the lukewarm milk. If you are using fresh yeast, you can crumble it directly into the milk. If using active dry yeast, you might want to add a tiny pinch of sugar to help it activate. Stir in the softened butter.
-
Combine Wet and Dry Ingredients: Make a well in the center of the flour mixture in the large bowl. Pour the yeast and butter mixture into this well. Next, break the egg and add it to the same well.
-
Form the Dough: Gradually pour the remaining lukewarm milk into the flour, a little bit at a time, while mixing everything together. Begin to bring the ingredients together to form a smooth, cohesive dough. You can do this with a spoon or spatula initially, then switch to using your hands as the dough becomes more solid.
-
First Rise: Once a smooth dough has formed, cover the bowl with a damp kitchen towel or plastic wrap. Place the bowl in a warm, draft-free spot and let the dough rise for approximately 1 hour. The dough should roughly double in size.
-
Knead and Shape: After the first rise, turn the dough out onto a lightly floured surface. Knead the dough well for about 5-10 minutes until it is elastic and smooth. This develops the gluten, which is crucial for the bolus’s chewy texture.
-
Divide the Dough: Cut the kneaded dough into small pieces, each weighing approximately 60 grams. Roll each piece into a ball.
-
Second Rise: Place the dough balls on a lightly floured surface or a baking sheet lined with parchment paper. Cover them loosely with plastic wrap or a clean kitchen towel and let them rise again for about 15 minutes.
-
First Coating: In a shallow bowl, mix the brown sugar and cinnamon together thoroughly. After the second rise, gently roll each dough ball through this sugar-cinnamon mixture for a first, light coating. This adds a subtle layer of sweetness and spice.
-
Third Rise: Once coated, arrange the dough balls on your baking sheet, leaving some space between them. Cover them again and allow them to rise for another 15 minutes.
-
The Art of the Swirl: Now comes the characteristic shaping of the bolus. Take one dough piece and roll it into a long string, about 1.5 cm in diameter. The key here is to make it long enough to wrap around your finger. The traditional method involves wrapping this string around your finger, like a turban, creating a spiral shape. Hold one end of the string between your thumb and forefinger and twist the string around your finger about two times. If this proves tricky, you can also form the spiral directly on a lightly floured countertop.
-
Prepare for Baking: Place the shaped boluses on a buttered baking sheet or one lined with parchment paper, ensuring they have ample space between them as they will expand during baking. Cover the baking sheet with plastic wrap or a damp cloth.
-
Final Rise: Let the boluses rest and rise for another 30 minutes. This final rise is essential for achieving that perfect, light yet chewy texture.
-
Preheat the Oven: While the boluses are having their final rise, preheat your oven to 250 degrees Celsius (480 degrees Fahrenheit). This high temperature is key to achieving the signature crisp, caramelized exterior.
-
Baking the Boluses: Carefully place the baking sheet with the risen boluses into the preheated oven. Bake for approximately 10 minutes, or until the boluses are golden brown and have developed a lovely caramelized crust. Keep a close eye on them, as they bake relatively quickly at this high temperature.
-
Immediate Transformation: As soon as the boluses come out of the oven, it is crucial to turn them over immediately. Use a spatula or tongs to flip each bolus so the sticky, molten sugar side is now on the bottom. Be extremely careful, as the melted sugar will be very hot and can cause burns. This step helps to create that distinct, sticky underside and prevents them from sticking to the baking sheet too firmly.
-
Cooling: Allow the boluses to cool down on the baking sheet for a few minutes. They are best enjoyed warm, when they are at their chewiest and stickiest. Do not let them cool completely to the point of drying out.
Expert Tips & Tricks
- Yeast Quality: Ensure your yeast is fresh and active. If you’re unsure, proof it first in a little warm milk with a pinch of sugar. It should become foamy within 5-10 minutes.
- Dough Consistency: The dough should be soft and slightly sticky but manageable after kneading. If it’s too dry, add a touch more milk; if too wet, add a little more flour.
- Spiral Shaping: Don’t be discouraged if your first few spirals aren’t perfect. The swirling technique takes a little practice. The key is to create a relatively even string before wrapping. The slight imperfections add to their charm.
- High Oven Temperature: The high oven temperature is non-negotiable for achieving the correct caramelization and texture. If your oven tends to run hot, you might want to slightly reduce the baking time or keep a closer watch.
- Immediate Turning: This is perhaps the most critical step for the authentic Zeeuwse bolus experience. Don’t skip it! The underside caramelization is what gives them their signature sticky texture.
Serving & Storage Suggestions
Zeeuwse bolussen are undeniably best served warm, straight from the oven or shortly after cooling. Their sticky, gooey nature makes them a delightful treat on their own. They pair wonderfully with a strong cup of coffee or a glass of milk, perfect for an afternoon pick-me-up.
For storage, it’s important to manage their stickiness. Once they have cooled sufficiently, you can store them in an airtight container at room temperature for up to 2 days. However, their texture is optimal on the day they are made. If you need to store them longer, you can freeze them in an airtight container for up to 1 month. To reheat, warm them gently in a low oven (around 150°C / 300°F) for a few minutes until heated through.
Nutritional Information
Here’s an estimated nutritional breakdown per bolus:
| Nutrient | Amount per Serving | % Daily Value |
|---|---|---|
| Calories | 268.8 kcal | |
| Calories from Fat | 66 kcal | |
| Total Fat | 7.3 g | 9% |
| Saturated Fat | 4.3 g | 21% |
| Cholesterol | 34.6 mg | 12% |
| Sodium | 86.8 mg | 4% |
| Total Carbohydrate | 45.4 g | 16% |
| Dietary Fiber | 1.7 g | 6% |
| Sugars | 21.4 g | 43% |
| Protein | 5.0 g | 10% |
Note: Nutritional values are estimates and can vary based on specific ingredients used.
Variations & Substitutions
While the classic Zeeuwse bolus is a masterpiece in itself, here are a few ideas to playfully adapt it:
- Spiced Variations: For a twist, you could add a pinch of ground cardamom or ginger to the cinnamon-sugar mixture.
- Citrus Zest: A little finely grated orange or lemon zest mixed into the dough can add a bright, zesty counterpoint to the sweetness.
- Less Sweet Version: If you prefer a less intensely sweet pastry, you can slightly reduce the amount of brown sugar in the coating. However, a significant reduction might affect the caramelization.
FAQs
Q: Can I use active dry yeast instead of fresh yeast?
A: Yes, absolutely. You’ll typically use about half the amount of active dry yeast compared to fresh yeast. It’s a good idea to proof active dry yeast in a little warm milk with a pinch of sugar to ensure it’s alive and active before adding it to the dough.
Q: My dough is too sticky to handle, what should I do?
A: A slightly sticky dough is normal for this type of enriched pastry. Resist the urge to add too much extra flour, as this can make the bolus dry. Lightly flour your hands and work surface when kneading and shaping. If it remains unmanageable, you can chill it briefly in the refrigerator to firm it up.
Q: Why is the oven temperature so high?
A: The high temperature is essential for achieving the characteristic caramelized, slightly crisp exterior of the Zeeuwse bolus. It rapidly cooks the outside, creating that delightful sticky glaze.
Q: How long do the boluses need to rise?
A: The recipe calls for three rising periods: 1 hour for the initial rise, 15 minutes after dividing, another 15 minutes after the first coating, and a final 30 minutes before baking. These stages are important for developing the texture.
Q: What does “turning the bolusses immediately” mean?
A: After baking, the sugar coating will be molten. Turning them over immediately after they come out of the oven ensures that the sticky sugar coats the bottom of the bolus, creating the signature sticky texture and preventing them from sticking too firmly to the baking sheet.
Final Thoughts
There’s a profound satisfaction in recreating a beloved traditional pastry in your own kitchen. The Zeeuwse bolus, with its simple yet profound flavors and irresistible sticky texture, is a testament to the beauty of well-executed baking. I encourage you to embrace the process, savor the aroma that fills your home, and delight in sharing these wonderfully sweet treats with loved ones. They are more than just pastries; they are a little piece of Dutch heritage, best enjoyed warm, sticky, and shared with a smile.