
Zurie’s Overnight No-Knead Bread: A Chef’s Embrace of Simplicity and Flavor
There are some recipes that land on your kitchen counter like an unexpected, perfectly ripe gift. Zurie’s Overnight No-Knead Bread is one such treasure. I remember the first time I encountered this method, it felt like a culinary revelation. The promise of a deeply flavorful, crusty loaf with minimal effort seemed too good to be true, a distant echo of those artisan bakeries where impossibly perfect boules seemed to materialize from thin air. It reminded me of my grandmother’s kitchen, the air thick with the scent of baking bread, a place where time seemed to slow down, and simple ingredients transformed into edible magic. This recipe, in its elegant simplicity, recaptures that feeling, offering a truly satisfying bread-making experience that’s accessible to everyone.
Recipe Overview
- Prep Time: 15 minutes active, 18 hours inactive
- Cook Time: 45-60 minutes
- Total Time: Approximately 20 hours (including rising time)
- Servings: 1 loaf
- Yield: 1 medium loaf
- Dietary Type: Vegan
Ingredients
This recipe celebrates the beauty of minimal ingredients, proving that true flavor often lies in the fundamentals.
- 3 cups white bread flour, (750 ml) – the recipe specifically notes not to use wholewheat flour for this particular loaf, as it lacks sufficient gluten for the desired texture.
- 1/2 teaspoon instant yeast – the magic leavening agent that does all the work while you sleep.
- 1/2 teaspoon sugar – a little something to feed the yeast and kickstart the fermentation.
- 2 teaspoons salt – crucial for flavor development and strengthening the dough structure.
- 12-13 fluid ounces water (415 ml) – the exact hydration is key to achieving that signature soft, airy interior.
Equipment Needed
The beauty of this recipe lies in its lack of specialized equipment. However, a few key items will make the process smoother:
- A large mixing bowl (lightly greased)
- Plastic wrap
- A clean kitchen towel or two
- A heavy, oven-safe pot with a tight-fitting lid (such as cast iron, Le Creuset, or ceramic)
- A spatula (silicone works wonderfully)
- Oven
- Wire cooling rack
Instructions
The process for Zurie’s Overnight No-Knead Bread is a testament to patience and the power of time. While the instructions might seem lengthy, each step is designed for clarity and ease, ensuring a successful outcome.
- In a lightly greased plastic bowl, combine the white bread flour, instant yeast, sugar, and salt. Stir these dry ingredients together until they are well mixed.
- Add the water to the dry ingredients. Stir everything together until you achieve a nice, smooth, and quite sloppy dough. The consistency should be quite wet.
- Cover the bowl tightly with plastic wrap, then place a kitchen towel or two over the top. Find a draught-free place for the bowl and let it stand for 18 hours. A good rhythm is to mix this up at 3 pm, so it will be ready at 9 am the following morning.
- After 18 hours, the dough should appear puffy and may have small bubbles on its surface. Don’t worry too much about its exact appearance; the slow fermentation is the key.
- Instead of turning the dough out onto a floured surface as some recipes dictate, we’ll handle it directly in the bowl. From the sides of the bowl, gently scrape the dough away with lightly floured fingers, folding it over on itself. Rotate the bowl and repeat this folding process, gently flattening the dough as you go. The goal is to create a slightly more cohesive shape without aggressive handling.
- Cover the bowl again with the same plastic wrap and kitchen towels.
- Let the dough rise again for 2 hours.
- About 30 minutes before the 2-hour second rise is complete, preheat your oven to 450°F (220°C).
- At the same time, place your heavy pot with its fitting lid into the cold oven. This pot will heat up with the oven, which is crucial for developing that signature crust. The lid is essential for trapping steam, which helps create a beautifully crisp exterior.
- While your pot is heating, prepare your dough. Once the second rise is finished, carefully take out the piping hot pot from the oven. Place it on a heat-resistant surface like a granite countertop or a sturdy trivet.
- Have your covered dough nearby and a silicone or other spatula ready. Gently tilt the plastic bowl over the hot pot (being careful not to let the bowl touch the very hot pot itself) and scrape the dough lightly and evenly into the hot pot. The dough will sizzle as it hits the hot surface – this is perfectly normal.
- Give the pot a slight shake to help distribute the dough evenly. Place the lid back on, and carefully transfer the entire pot into the preheated oven.
- Bake for 30 minutes with the lid on.
- After 30 minutes, carefully remove the lid. Continue to bake for an additional 15 to 30 minutes, or until your bread has a beautiful golden-brown crust. Typically, about 15-20 minutes after removing the lid is sufficient, but baking times can vary depending on your oven.
- Once baked, turn the bread out of the pot onto a wire cooling rack. Resist the urge to cut into it immediately. Allow it to cool for at least 20 minutes so the interior can set and the crust retains its satisfying crunch.
A Note on Baking Times and Temperatures:
While 450°F (220°C) is the recommended temperature, the author notes that in a convection (fan) oven, a slightly lower temperature of 210-215°C can be used. Baking times will also differ between ovens. The 3-cup-flour bread is generally ready around 45 minutes of total baking time.
Making a Larger Loaf:
For a fatter loaf, the recipe suggests using 4 cups (1 litre) of white bread flour.
- 3/4 teaspoon instant yeast
- 3/4 teaspoon sugar
- 15 ml (3 teaspoons) salt
- 600 ml (19 fluid oz) water (this is just under 2 1/2 American cups, perhaps 2 teaspoons less)
- An edit from June 2008 suggests 666 ml of water for optimal results. The author also notes that more salt might be beneficial, suggesting 4 teaspoons (1 tablespoon + 1 teaspoon).
- This larger loaf requires a full hour of baking time.
- When greasing the pot for the larger loaf, either grease it well or pour some melted butter or olive oil into the hot pot and tilt to coat the bottom. A silicone spatula is highly recommended for transferring the larger dough mass into the super-hot pot.
Expert Tips & Tricks
- The Pot is Key: The heavy, lidded pot is non-negotiable for achieving that incredible crust. Ensure it preheats thoroughly with the oven. Trying to bake the dough in a cold pot will significantly impact the rise and crust development.
- Flour Matters: While white bread flour is the standard, the author expresses a fondness for stone-milled flour for its robust flavor. A small amount of fine rye flour can also be a delightful addition, but avoid large quantities of wholewheat flour, which can weigh down the delicate crumb.
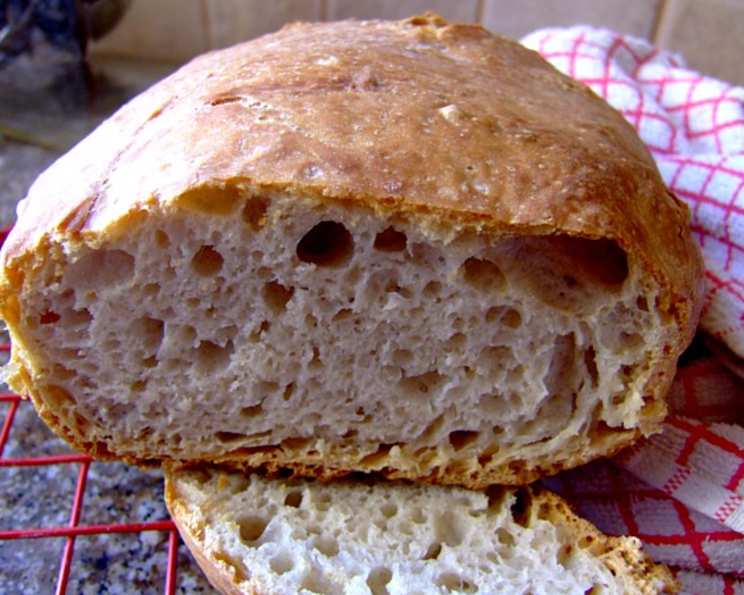
- Dough Consistency: Don’t be alarmed by the wetness of the dough. This is what contributes to the open, airy interior of the finished loaf.
- Patience is a Virtue: The 18-hour initial rise is where much of the flavor develops. Resist the urge to shorten this time.
- Gentle Handling: The folding technique in step 5 is about coaxing the dough into a manageable shape, not about developing gluten through kneading. Be gentle.
Serving & Storage Suggestions
This bread is at its absolute finest when served warm, shortly after cooling. Slice off a generous end piece and slather it with real butter. It’s a simple pleasure that needs no embellishment.
When storing, avoid plastic bags, which can make the crust soft. A paper bag is ideal. Alternatively, turn the cooled loaf cut-side down on a breadboard and cover it with a clean kitchen towel. This bread is best enjoyed within a day or two. Refrigeration is not recommended, as it can dry out the bread.
Nutritional Information
Here is an estimated nutritional breakdown for one serving of this bread. Please note that these are approximate values and can vary based on specific ingredients used.
| Nutrient | Amount per Serving | % Daily Value |
|---|---|---|
| Calories | 1380 kcal | 276% |
| Total Fat | 3.8 g | 5% |
| Saturated Fat | 0.6 g | 3% |
| Cholesterol | 0 mg | 0% |
| Sodium | 4670 mg | 195% |
| Total Carbohydrate | 289 g | 96% |
| Dietary Fiber | 10.7 g | 43% |
| Sugars | 3.1 g | 3% |
| Protein | 39.5 g | 79% |
Note: The sodium content is quite high due to the salt used in the recipe. If you are monitoring your sodium intake, you may wish to reduce the salt slightly, though it will impact flavor.
Variations & Substitutions
While this recipe is designed for classic white bread flour, adventurous bakers might consider:
- Flour Blend: Experiment with replacing up to 1 cup of white bread flour with a finely stone-milled flour for added depth and nuttiness. A small amount of fine rye flour (up to 1/2 cup) can also add complexity.
- Herbs and Seeds: For a savory twist, you could try incorporating herbs like rosemary or thyme or a handful of sunflower or pumpkin seeds into the dough during the initial mixing stage. However, be mindful that additions might slightly alter the dough’s hydration.
FAQs
Q: Why does this bread need to rise for 18 hours?
A: The long, slow fermentation allows for complex flavors to develop and creates a light, airy crumb without any kneading.
Q: Can I use all-purpose flour instead of bread flour?
A: Yes, you can use all-purpose flour, but bread flour provides a higher gluten content, which is beneficial for the structure of this particular bread.
Q: My dough seems too wet, is that normal?
A: Yes, this recipe results in a very wet and sticky dough, which is characteristic of no-knead breads and essential for achieving a tender interior.
Q: What kind of pot is best for this recipe?
A: A heavy, oven-safe pot with a tight-fitting lid is crucial. Cast iron, enameled cast iron (like Le Creuset), or heavy ceramic pots work wonderfully.
Q: How do I know when the bread is fully baked?
A: The bread should have a deep golden-brown crust. You can also tap the bottom of the loaf; it should sound hollow.
Final Thoughts
Zurie’s Overnight No-Knead Bread is more than just a recipe; it’s an invitation to slow down and connect with the elemental magic of baking. It’s a testament to the fact that extraordinary results can come from the simplest of actions, requiring only time and a little trust in the process. This loaf, with its shatteringly crisp crust and tender, open crumb, is perfect served with a generous dollop of butter, a bowl of hearty soup, or simply enjoyed on its own. Give it a try, and let the aroma of freshly baked bread fill your home. Share your triumphs, your little imperfections, and the pure joy of breaking bread with loved ones.